

Building an Endless Runner Game with Three.js, Mixamo, Vite, and Planetscale (Part Three)


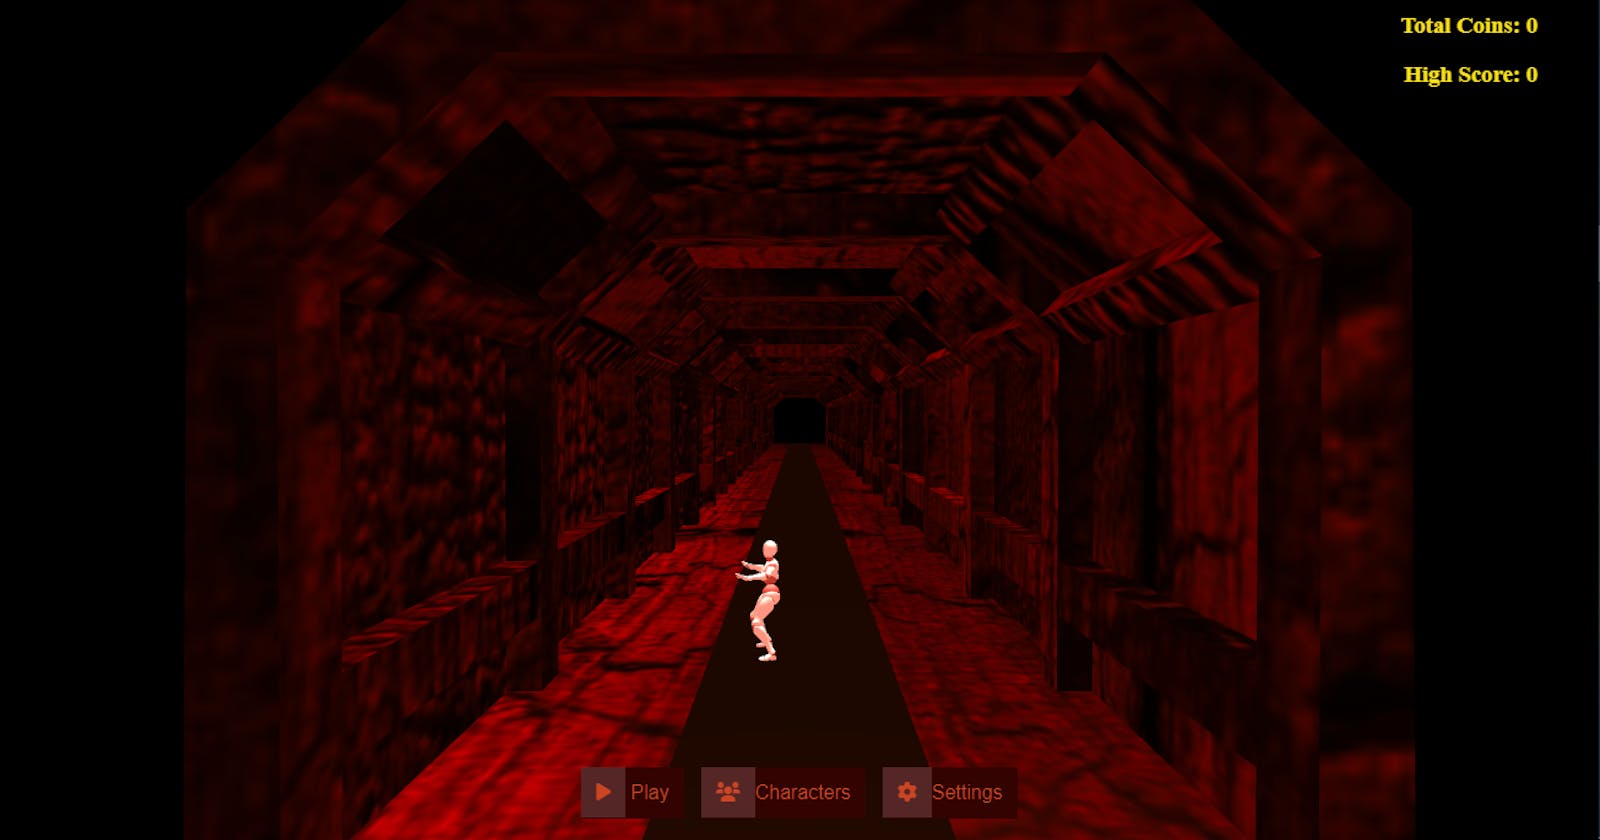
Table of contents
- Introduction
- GitHub Repository
- Setting up the Main Menu scene
- Importing The Wooden Cave and Lights into the scene
- Importing the character and its dancing animation
- Updating The User Interface
- Hiding the main menu scene
- The Main Menu Initialize Method
- Updating the running scene side method
- Switching between the Main Menu Scene and running scene
- Summary and next steps
Introduction
Hello again, this is the third part of a series titled: Building an endless runner game with Threejs, Mixamo, Netlify, and PlanetScale. The game is called "Cave Runner" and it features a 3D character running through a wooden cave, avoiding obstacles and collecting coins. The coins can be used to unlock other characters.
This series was divided into five sections:
In the previous section, I explained the long process of building the Runner Scene. I imported the default character, animated it, moved it left and right, and made it jump and slide. I also explained how to detect collisions using the Axis-Aligned Bounding Box (AABB). I used the AABB method to check if the player intersects with the coins and obstacles.
In this part of the series, I will discuss how to build the Main Menu Scene. The Main Menu Scene is the first scene that will appear once the game has finished loading. The Player can choose to go to the Running Scene or Character Selection Scene from the Main Menu Scene. Also, they can exit from the Running Scene or Character Selection back to the Main Menu Scene.
GitHub Repository
The GitHub repository containing the finished code of this game is here: https://github.com/tope-olajide/cave-runner, and the game can be played here: https://cave-runner.netlify.app.
Note that I divided this project into different branches on GitHub. The source code for this section is available here: https://github.com/tope-olajide/cave-runner/tree/ft-main-menu-scene. With Netlify, each branch in this repository can be deployed, and the code for this particular branch was deployed here: https://deploy-preview-5--cave-runner.netlify.app/.
Setting up the Main Menu scene
Let's create an empty class called MainMenuScene with four methods:
import {
  Scene
} from 'three';

import { FBXLoader } from 'three/examples/jsm/loaders/FBXLoader';

export default class MainMenuScene extends Scene {
 async load() {}
 initialize() {}
 update() {}
 hide() {}
}
In the previous section, I described the functions of the four methods and how they will be used in the game.
Importing The Wooden Cave and Lights into the scene
The wooden cave will not be moving this time. It will be used as a stationary background for the Main Menu Scene.
import { Scene, Object3D, AmbientLight, DirectionalLight, } from 'three';

import { FBXLoader } from 'three/examples/jsm/loaders/FBXLoader';
Let's add two new private properties called fbxLoader and woodenCave
  private fbxLoader = new FBXLoader();

  private woodenCave = new Object3D();
In the load() method, we will import the wooden cave and add lights to the scene:
    this.woodenCave = await this.fbxLoader.loadAsync('./assets/models/wooden-cave.fbx');
    this.woodenCave.position.set(0, 0, -500);
    this.woodenCave.scale.set(0.055, 0.055, 0.055);
    this.add(this.woodenCave);

    const ambient = new AmbientLight(0xFFFFFF, 2.5);
    this.add(ambient);

    const light = new DirectionalLight(0xFFFFFF, 2.5);

    light.position.set(0, 40, -10);
    this.add(light);
Importing the character and its dancing animation
In the Main Menu Scene, we will import the default character for the game and play its dancing animation.
Let's import the Clock, AnimationMixer, and AnimationAction objects from threejs
javascript import { Scene, Object3D, AmbientLight, DirectionalLight, Clock, AnimationMixer, AnimationAction, } from 'three';
Next we will create five new private properties namely: player, delta, clock, AnimationMixer and dancingAnimation:
  private player = new Object3D();

  private delta = 0;

  private clock = new Clock();

  private AnimationMixer!: AnimationMixer;

  private dancingAnimation!: AnimationAction;
Finally, we can import the player and play its dancing animation:
this.player = await this.fbxLoader.loadAsync('../../assets/characters/xbot.fbx'); this.player.position.z = -110; this.player.position.y = -35; this.player.scale.set(0.1, 0.1, 0.1); this.player.rotation.y = 180 * (Math.PI / 180); this.add(this.player);

const dancingAnimationObject = await this.fbxLoader.loadAsync('../../assets/animations/xbot@dancing.fbx'); this.AnimationMixer = new AnimationMixer(this.player); this.dancingAnimation = this.AnimationMixer.clipAction(dancingAnimationObject.animations[0]); this.dancingAnimation.play();
To make the animation work, let's add this to the update method:
  update() {
    if (this.AnimationMixer) {
      this.delta = this.clock.getDelta();
      this.AnimationMixer.update(this.delta);
    }
  }
Our 3D character should be dancing now.
Updating The User Interface
We are going to add some texts to the main menu. We will display the high score and the total coins of the player at the top-right on the main menu. After that, we will add three buttons at the bottom of the main menu scene. The Buttons are:
Play Button
Characters Button and
Settings Button (I later changed this to the 'About' button.)
In this section, we will make the game switch to the Running Scene when the player clicks the Play button. When the player is in the Running Scene, we will make the game switch back to the Main Menu when the 'Quit Game' button is clicked.
Let's update the design by launching the index.html file and replacing the code with the following:
<!DOCTYPE html>
<html lang="en">
  <head>
    <meta charset="UTF-8" />
    <link rel="icon" type="image/svg+xml" href="favicon.svg" />
    <meta name="viewport" content="width=device-width, initial-scale=1.0" />
    <link rel="stylesheet" href="./src/style.css" />
    <link
      rel="stylesheet"
      href="https://cdnjs.cloudflare.com/ajax/libs/font-awesome/6.0.0/css/all.min.css"
    />
    <title>Cave Runner</title>
  </head>

  <body>
    <div class="coins-container">
      <h3>Coins: <span class="coins-count">0</span></h3>
    </div>
    <div class="scores-container">
      <h3>Scores: <span class="scores-count">0</span></h3>
    </div>

    <div class="pause-button">
      <button class="btn-icon-only">
        <span class="btn-icon"><i class="fa-solid fa-pause"></i></span>
      </button>
    </div>

    <div id="game-paused-modal" class="modal">
      <div class="modal-body" id="">
        <br />
        <h1>Game Paused!</h1>
        <br />
        <button class="btn" id="resume-button">
          <span class="btn-icon"><i class="fa-solid fa-refresh"></i></span>
          Resume</button
        ><br />
        <button class="btn" id="quit-button">
          <span class="btn-icon"><i class="fa-solid fa-times"></i></span>
          Quit Game</button
        ><br />
      </div>
    </div>

    <div id="game-over-modal" class="modal">
      <div class="modal-body" id="game-over-modal">
        <h1>Game Over</h1>
        <p>Your Scores:<span id="current-score"></span></p>
        <p>Coins:<span id="current-coins"></span></p>
        <button class="btn" id="restart-button">
          <span class="btn-icon"><i class="fa-solid fa-refresh"></i></span>
          Restart
        </button>
        <button class="btn" id="game-over-quit-button">
          <span class="btn-icon"><i class="fa-solid fa-times"></i></span>
          Quit Game
        </button>
      </div>
    </div>

    <!-- Main menu buttons  -->
<section id="main-menu-buttons">
  <button id="play-game-button" class="btn">
    <span class="btn-icon"><i class="fa-solid fa-play"></i></span
    > Play
  </button>
  <button class="btn" id="Characters-selection-button">
    <span class="btn-icon"><i class="fa-solid fa-users"></i></span
    >Characters
  </button>
  <button class="btn">
    <span class="btn-icon"><i class="fa-solid fa-gear"></i></span
    >Settings
  </button>
</section>

<!-- Coins and Highscores section -->
<div class="high-score-container"><h3>High Score: <span class="high-score">0</span> </h3></div>
<div class="total-coins-container"><h3> Total Coins: <span class="total-coins">0</span></h3></div>


    <div class="loading-container">
      <img src="./public/assets/images/loader.gif" />
    </div>
    <div class="disable-touch"></div>
    <div></div>
    <canvas id="app"> </canvas>

    <script type="module" src="/src/main.ts"></script>
  </body>
</html>
Let's update the style.css file with the following code:
html, body {
  overflow: hidden;
  margin: 0px;
  height: 100%;
}

#app {
  font-family: Avenir, Helvetica, Arial, sans-serif;
  -webkit-font-smoothing: antialiased;
  -moz-osx-font-smoothing: grayscale;
  text-align: center;
  width: 100%;
  height: 100%;
  display: block;
}
.high-score-container,
.total-coins-container,
.coins-container,
.scores-container {
    position: absolute;
    top: 0;
    color: #F2E205;
    right: 0;
    padding: 0px 50px ;
    background-color: #00000063;
    display: none;
}
.high-score-container,
.coins-container {
  margin-top: 40px;
}

.coins-container h3,
.scores-container h3 {
margin:.5rem;
}
.pause-button {
  position: absolute;
  left: 0;
  top: 0;
  margin: 20px 10px;
  display: none;
}

.modal {
  display: none;
  position: fixed;
  z-index: 1;
  padding-top: 100px;
  left: 0;
  top: 0;
  width: 100%;
  height: 100%;
  overflow: auto;
  background-color: rgba(0, 0, 0, 0.4);
}

.modal-body {
  background-color: #BA4D31;
  margin: 50px auto;
  padding: 10px;
  border: 10px solid #2C0604;
  width: 300px;
  opacity: 0.8;
  color: #2C0604;
}

.btn, .btn-icon-only {
background-color: #2C0604;
border: none;
color: #BA4D31;
padding: 12px 12px 12px 0;
font-size: 16px;
cursor: pointer;
margin: 5px;
}

.btn-icon-only {
  padding: 0px;
  color:#F2E205;

}

.btn-icon {
  background-color: #4e2828;
  padding: 12px;
}

.btn:hover {
  opacity: .9;
}
#game-paused-modal {
  display: none;
  text-align: center;
}


#game-over-modal {
  text-align: center;
}
#game-over-modal h1 {
  font-size: 1.5rem;
  margin: 0;
}
#game-over-modal p {
  font-size: 1.3rem;
  margin: 0.8rem;
}

.disable-touch {
  width: 100%;
  height: 100%;
  position: absolute;
  display: none;
}

.loading-container{
  width: 100%;
  height: 100%;
  position: absolute;
  display: flex;
  align-items: center;
  justify-content: center;
}
.loading-container img{
  width: 200px;
}

/* Main Menu buttons */
#main-menu-buttons {
  position: absolute;
  bottom: 0;
  margin: 0 auto;
  left: 0;
  right: 0;
  display: flex;
  text-align: center;
  display: none;
}
#main-menu-buttons button {
  margin-bottom: 20px;
}
Hiding the main menu scene
Once we are finished using the Main Menu Scene, we need to stop all processes running within it and hide it before rendering the next scene. If we do not do this, all the scenes will overlap, causing increased strain on the CPU as everything in the Main Menu Scene, Running Scene, and Character Selection Scene will be running at the same time. This could cause the game to lag or crash.
Let's update the hide() method with the following code:
  hide() {
    this.visible = false;
    this.clock.stop();
    (document.querySelector('#main-menu-buttons') as HTMLInputElement).style.display = 'none';
    (document.querySelector('.high-score-container') as HTMLInputElement).style.display = 'none';
    (document.querySelector('.total-coins-container') as HTMLInputElement).style.display = 'none';
  }
The this keyword in JavaScript can be tricky because it can refer to different objects depending on your use. In our case, this in every method refers to the class object. The this.visible = false means hide the MainMenuScene class. The this.clock.stop(); stops the dancing animation and everything else in the scene that depends on the clock. I also hide all the main menu buttons, the high score, and total coins that appear on the top right of the main menu screen because I don't want them to show up in the next scene
The Main Menu Initialize Method
The initialize method is the first method that will be invoked when you switch to a new scene. This is where to display everything that was hidden and restart everything that was stopped in the hide method. Let's update the Main Menu initialize method with the following code:
initialize() {
  (document.querySelector('#main-menu-buttons') as HTMLInputElement).style.display = 'block';
  (document.querySelector('.high-score-container') as HTMLInputElement).style.display = 'block';
  (document.querySelector('.total-coins-container') as HTMLInputElement).style.display = 'block';

  (document.querySelector('.high-score') as HTMLInputElement).innerHTML = JSON.parse(localStorage.getItem('highScore')!) || 0;
  (document.querySelector('.total-coins') as HTMLInputElement).innerHTML = JSON.parse(localStorage.getItem('totalCoins')!) || 0;

  if (!this.visible) {
    this.visible = true;
  }
  if (!this.clock.running) {
    this.clock.start();
  }
}
First, we make the previously hidden text elements visible. Then we set the 'high-score' and 'total-coins' values to those stored in local storage, or 0 if no value is present. Finally, we make the scene visible again and start the clock to allow the character to immediately begin dancing again when switching back to the Main Menu.
Updating the running scene side method
When we are finished with the Running Scene, we need to hide and stop any relevant elements just as we did with the Main Menu Scene.
Let's open up the RunningScene.ts file and update the hide method inside it with the following code:
hide() { (document.querySelector('.disable-touch') as HTMLInputElement).style.display = 'none';

this.isGameOver = false;

this.coins = 0;

this.scores = 0;

(document.getElementById('game-paused-modal') as HTMLInputElement).style.display = 'none';

(document.querySelector('.scores-container') as HTMLInputElement).style.display = 'none';

(document.querySelector('.coins-container') as HTMLInputElement).style.display = 'none';

(document.querySelector('.pause-button') as HTMLInputElement).style.display = 'none';

this.visible = false;

this.currentObstacleOne.position.z = -1200; this.currentObstacleTwo.position.z = -1500;

this.activeCoinsGroup.position.z = -1200; this.currentAnimation.stop();

this.clock.stop(); }
Switching between the Main Menu Scene and running scene
Let's open the main.ts file in the src directory.
First, we will import the MainMenuSceneinto it:
import MainMenuScene from './scenes/MainMenuScene';
After that, we will create a new variable called currentScene.
let currentScene: MainMenuScene | RunningScene;
We will use the currentScene variable to store the scene that is currently being rendered to the screen. That is why it has two types: the MainMenuScene and RunningScene . I used the pipe symbol (|) to specify that. The pipe symbol is called union types in TypeScript, it allows us to define a variable as two or more types. So if any other object that is not of MainMenuScene or RunningScene type gets assigned or re-assigned to our currentScene variable, TypeScript will yell at us.
After that, we will create a new variable called mainMenuScene and instantiates the MainMenuScene() class into it.
const mainMenuScene = new MainMenuScene();
Next, We will create two new functions called switchToRunningScene and switchToMainMenuScene
const switchToRunningScene = () => {
  currentScene.hide();
  currentScene = runningScene;
  currentScene.initialize();
};

const switchToMainMenuScene = () => {
  currentScene.hide();
  currentScene = mainMenuScene;
  currentScene.initialize();
};
Anytime the switchToRunningScene function is invoked, it will hide the currentScene by calling the hide() method of the current scene that is being rendered first, then re-assign the runningScene to the currentScene variable (meaning that the runningScene is now the currentScene ). After that, it will call the initialize() method of the currentScene.
Same logic applies to the switchToMainMenuScene function.
Now let's call the two functions anytime the buttons assigned to them are clicked:
(document.getElementById('play-game-button')as HTMLInputElement).onclick = () => {
  switchToRunningScene();
};
(document.querySelector('#quit-button')as HTMLInputElement).onclick = () => {
  (document.getElementById('game-over-modal')as HTMLInputElement).style.display = 'none';
  switchToMainMenuScene();
};

(document.querySelector('#game-over-quit-button')as HTMLInputElement).onclick = () => {
  (document.getElementById('game-over-modal')as HTMLInputElement).style.display = 'none';
  switchToMainMenuScene();
};
One more thing, by default, when the game has finished loading we want the Main Menu Scene to be the first scene that will be rendered to the screen. Let's do that by assigning the mainMenuScene to the currentScene variable:
By default, we want the Main Menu Scene to be the first scene that is rendered when the game finishes loading. To do this, we can assign the mainMenuScene to the currentScene variable:
currentScene = mainMenuScene;
Let's update the render method to call the update method of the currentScene at every frame rate:
const render = () => {
  currentScene.update();
  renderer.render(currentScene, mainCamera);
  requestAnimationFrame(render);
};
Finally, let's update the main method to call the runningScene and mainMenuScene's load() method.
const main = async () => {
  await runningScene.load();
  await mainMenuScene.load();
  (document.querySelector('.loading-container') as HTMLInputElement).style.display = 'none';
  currentScene.initialize();
  render();
};
I made a loading-container section in the html file and made its class visible in the CSS file. It is a temporary loading container that displays a loading gif image while the scene assets is being loaded. Once they have finished loading I used this part:
(document.querySelector('.loading-container') as HTMLInputElement).style.display = 'none';
to hide the loading container then this method: currentScene.initialize(); will call the initialize method of the current scene(Main Menu Scene in this case).
Summary and next steps
In this part of the series, I explained how I created the Main Menu Scene and how to switch between it and the Running Scene.
In the next part of the series, I will explain how to:
Display all the available characters in the game
Buy and unlock a character
Use the unlocked character in every scene