


Object pooling is an essential design pattern in software development. It involves reusing objects rather than creating and destroying them frequently. It is a very important concept when building interactive web or when developing games. It helps improve the performance, scalability, and memory usage of an application by reusing pre-initialized objects instead of creating new ones every time they are needed.
The need for object pooling
What happens when you create and delete an object?
When you create an object, the memory is allocated for it, this process takes time and CPU resources. When you delete an object, its memory is released, this process also takes time and CPU resources.
What happens when you create and delete an object frequently?
When you create and delete objects frequently, this can lead to memory fragmentation, which means that the available memory becomes fragmented into small, unusable pieces. This can make it harder to allocate large blocks of memory when needed, slowing down your application or game.
In addition, creating and deleting objects frequently can also increase the number of memory allocations and deallocations, which can put pressure on the garbage collector in JavaScript. The garbage collector is used to monitor memory allocation and determine when a block of allocated memory is no longer being used by the application and then safely remove them to free up memory.
When the garbage collector runs, it requires CPU time to scan the memory and determine which objects are still in use and which are not. Depending on the size of the memory being managed and the complexity of the program being run, the garbage collector can consume significant amounts of CPU resources. Excessive CPU usage by the garbage collector can result in a detrimental impact on the performance of your application or game.
JavaScript developers need not be concerned with directly managing the garbage collection process since it is continuously running in the background, and is handled automatically by the JavaScript engine. Moreover, garbage collectors in JavaScript are optimized for efficiency and have minimal impact on system performance.
What we are working on
To better explain the concept of object pooling, I have modeled a 3D fighter jet and a missile with Blender. The fighter jet will be used to shoot the missile. The missile will be pooled initially, then taken from the pool when they are fired and returned back to the pool when they are no longer needed (i.e. when they have traveled a certain distance and are no longer visible to the camera) for later use. If you do this without using the object pool pattern, that means you will have to create the missile anytime it is fired and destroy it when it's no longer needed.
For example, let's say there's a game level that requires a player to launch 100,000 missiles to defeat enemies and progress to the next stage. If you create and destroy a missile for each shot, it can put a heavy load on the CPU and cause the game to slow down whenever the garbage collector run to free up unused memory. However, if you generate around 500 missiles beforehand and reuse them throughout the game level, it can significantly alleviate the workload on the CPU and prevent any performance issues.
The finished project and GitHub Repo
You can view the completed project at this link: object-pooling.vercel.app, and the source code can be found in the GitHub repository located here: github.com/tope-olajide/object-pooling-with...
Setting up the project
To get started, create a new folder in your workspace directory called object-pooling or choose any other suitable name that you prefer. Navigate to the directory on your CLI and run the following command:
yarn create vite
You will be prompted to choose a framework, select the vanilla option. When prompted to select a variant, choose TypeScript.
Now, you can run the following command to install the configured package:
yarn
After that, run the following command to install three.js and typescript:
yarn add three
Next, install three.js typing files by running this command:
yarn add --dev @types/three
Setting up the scene
Once the installation is complete, open the src/index.html file and replace everything with the following code:
<!DOCTYPE html>
<html lang="en">
  <head>
    <meta charset="UTF-8" />
    <link rel="icon" type="image/svg+xml" href="favicon.svg" />
    <link rel="stylesheet" href="./src/style.css" />
    <meta name="viewport" content="width=device-width, initial-scale=1.0" />
    <title>Object Pooling in Threejs</title>
  </head>
  <body>
    <canvas id="app"> </canvas>
    <script type="module" src="/src/main.ts"></script>
  </body>
</html>
Then open up the src/style.css and replace everything with the following code:
html,
body {
  overflow: hidden;
  margin: 0px;
  height: 100%;
}

#app {
  font-family: Avenir, Helvetica, Arial, sans-serif;
  -webkit-font-smoothing: antialiased;
  -moz-osx-font-smoothing: grayscale;
  text-align: center;
  width: 100%;
  height: 100%;
  display: block;
}
In the src folder, create a new directory called scenes. Inside the scenes folder, create a new file named MainScene.ts and add the following code to it:
import { Scene } from "three";

export default class MainScene extends Scene {
  async load() {}
  initialize() {}
  update() {}
}
The code above defines a class named MainScene that extends the Scene class from the Three.js library. In case you are not familiar with the Scene class, it is used to create a 3D scene and manage its objects, including lights, and cameras.
We defined three empty methods in the MainScene:
async load() {}: This method will be used to load any assets that are required by the scene asynchronously. Theasynckeyword indicates that this method returns a Promise, which will resolve once the loading process is complete.initialize() {}: This method will be used to set up the scene once all the assets have been loaded.update() {}: This method will be called every frame and it will be used to update the state of the scene.
In the src folder, open the main.ts file and replace everything inside it with the following code:
import { WebGLRenderer, PerspectiveCamera } from 'three';

import MainScene from './scenes/MainScene';

const width = window.innerWidth;
const height = window.innerHeight;

const renderer = new WebGLRenderer({
  canvas: document.getElementById('app') as HTMLCanvasElement,
  antialias: true,
});

renderer.setSize(width, height);

const mainCamera = new PerspectiveCamera(50, width / height, 0.1, 1000);

function onWindowResize() {
  mainCamera.aspect = window.innerWidth / window.innerHeight;
  mainCamera.updateProjectionMatrix();

  renderer.setSize(window.innerWidth, window.innerHeight);
}

window.addEventListener('resize', onWindowResize);

const mainScene = new MainScene();

const render = () => {
  mainScene.update();
  renderer.render(mainScene, mainCamera);
  requestAnimationFrame(render);
};

const main = async () => {
  await mainScene.load();
  mainScene.initialize();
  render();
};

main();
In the above code, we set up a WebGL renderer and a perspective camera with dimensions based on the window size. Next, an instance of the MainScene class is created, and a render function is defined. This function updates the scene and renders it using the renderer and camera. It also uses requestAnimationFrame() to call itself recursively for smooth animation.
Finally, an asynchronous main function is defined. This function will load the assets required by the scene using the load() method, initializes the scene using initialize(), and then calls the render() function to start the rendering loop.
Adding the lights
To add all the necessary lights to the scene, update the initialize method with the following code:
import { AmbientLight, DirectionalLight, Scene } from "three";

export default class MainScene extends Scene {
  async load() {}
  initialize() {
    const ambient = new AmbientLight(0xffffff, 0.5);
    this.add(ambient);

    const light = new DirectionalLight(0xffffff, 1);
    light.position.set(0, 40, 0);
    this.add(light);
}
  update() {}
}
In the initialize() method, we created an ambient light and a directional light and add them to the scene. The ambient light illuminates all objects in the scene with a constant level of brightness, while the directional light illuminates objects as if they were being lit by a single, bright light source located at a specific position. This method positions the directional light at (0, 40, 0) relative to the scene.
Although light has been added to the scene, there are no objects or elements in the scene to illuminate, so the scene remains dark.
Creating the skybox
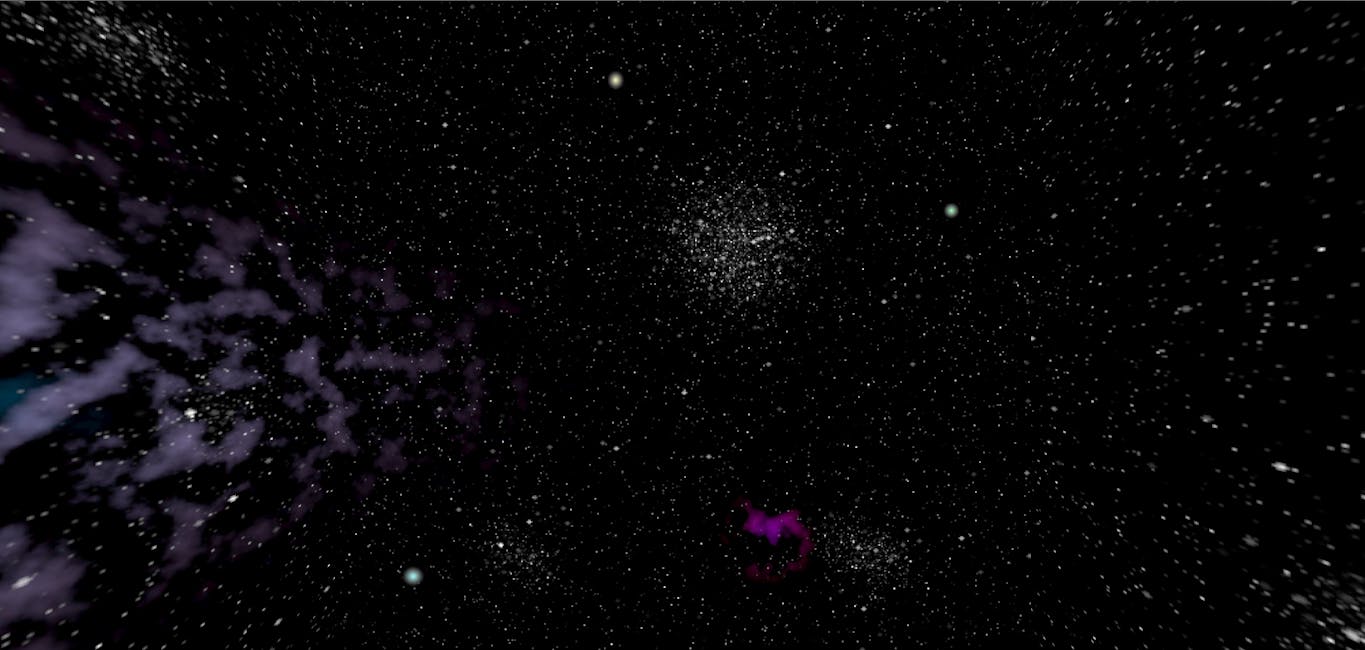
A skybox is a technique used to simulate a realistic outdoor environment. It is essentially a cube with images mapped onto its faces that gives the illusion of a three-dimensional space surrounding the viewer. To build the skybox, we are going to load the images we want to use as the skybox as threejs texture. In the public directory, create the following directories assets/purplenebula. Then download the images from the source file here and place them in the purplenebula directory.
In the MainScene.ts file, import TextureLoader, MeshBasicMaterial, BackSide, BoxGeometry, and Mesh from threejs:
import {
  AmbientLight,
  DirectionalLight,
  Scene,
  TextureLoader,
  MeshBasicMaterial,
  BackSide,
  BoxGeometry,
  Mesh,
} from "three";
Then enter the following code within the load() method:
   let materialArray = [];
    let texture_ft = new TextureLoader().load(
      "./assets/skybox/purplenebula/purplenebula_ft.png"
    );
    let texture_bk = new TextureLoader().load(
      "./assets/skybox/purplenebula/purplenebula_bk.png"
    );
    let texture_up = new TextureLoader().load(
      "./assets/skybox/purplenebula/purplenebula_up.png"
    );
    let texture_dn = new TextureLoader().load(
      "./assets/skybox/purplenebula/purplenebula_dn.png"
    );
    let texture_rt = new TextureLoader().load(
      "./assets/skybox/purplenebula/purplenebula_rt.png"
    );
    let texture_lf = new TextureLoader().load(
      "./assets/skybox/purplenebula/purplenebula_lf.png"
    );
    materialArray.push(new MeshBasicMaterial({ map: texture_ft }));
    materialArray.push(new MeshBasicMaterial({ map: texture_bk }));
    materialArray.push(new MeshBasicMaterial({ map: texture_up }));
    materialArray.push(new MeshBasicMaterial({ map: texture_dn }));
    materialArray.push(new MeshBasicMaterial({ map: texture_rt }));
    materialArray.push(new MeshBasicMaterial({ map: texture_lf }));

    for (let i = 0; i < 6; i++) materialArray[i].side = BackSide;

    let skyBoxGeo = new BoxGeometry(1000, 1000, 2000);
    let skyBox = new Mesh(skyBoxGeo, materialArray);
    this.add(skyBox);
We loaded six different images of a space environment and mapped them onto the inner surfaces of a large cube.
Then we created an empty array called materialArray to hold the six materials that will be applied to the cube's inner surfaces. after that, we use the TextureLoader object to load the six different images of the space environment from the /assets/skybox/purplenebula path, and then create a new MeshBasicMaterial object for each image using the map property. These materials are then pushed into the materialArray.
Then we create a BoxGeometry object with dimensions of 1000 x 1000 x 2000 and creates a new Mesh object by passing this geometry and the materialArray to its constructor. This Mesh object represents the skybox, and it is added to the MainScene object using the add method.
You can check out this awesome tutorial on Codinhood for more information on how to create a skybox in three.js.
Run the following command on your CLI:
yarn dev
Then visit http://localhost:5173/ on your browser.
Assuming there were no errors, you should be able to view an output similar to this in your web browser:
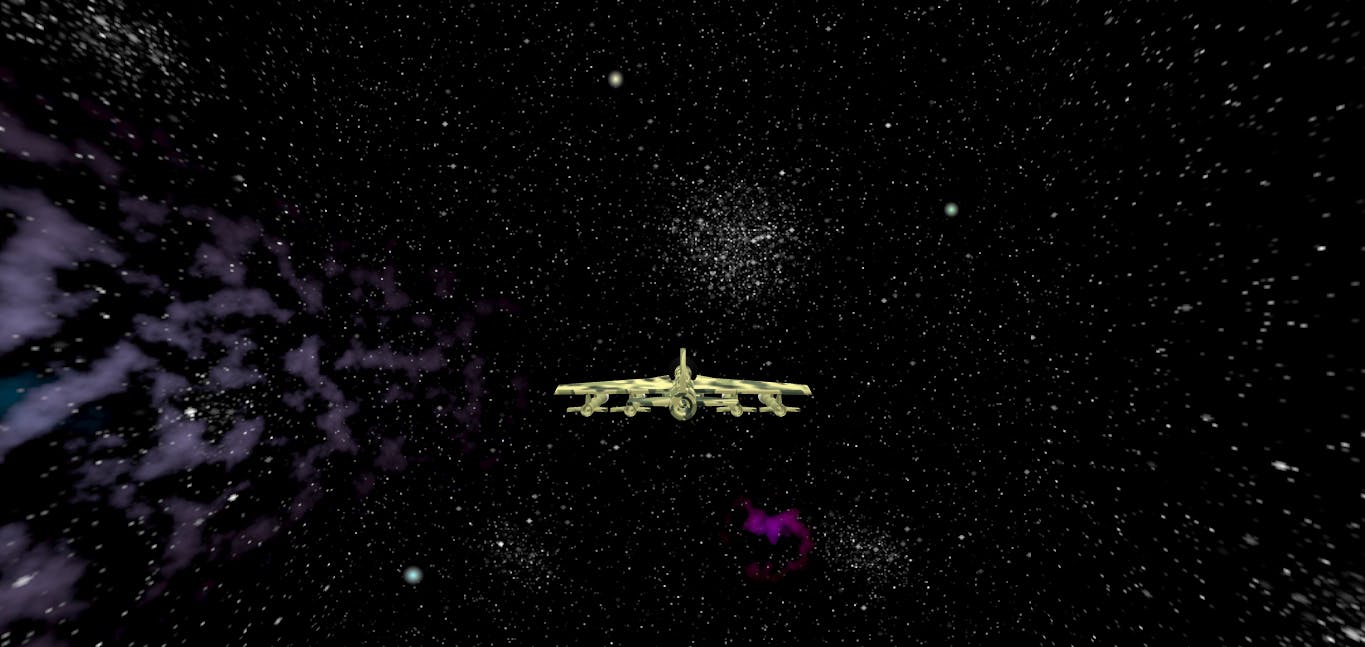
Importing the Fighter Jet and Missile Model
The fighter jet and missile models used in this tutorial have already been included in the public/assets directory of this tutorial file on GitHub. You can simply download them and add them to the same directory in your project.
Import the GLTFLoader module from the three/examples/jsm/loaders
import { GLTFLoader } from 'three/examples/jsm/loaders/GLTFLoader.js';
Now, let's create 3 new private properties:
  private glbLoader = new GLTFLoader();
  private fighterJet = new Object3D();
  private missile = new Object3D();
First, a new instance of the GLTFLoader called glbLoader, which will be used to load the 3D models of the fighter jet and missile was created.
Then two new Object3D objects called fighterJet and missile are created. These objects will be used to hold the 3D models once they are loaded by the GLTFLoader.
Import the fighterJet and missile by adding the following code to the load() method:
    const fighterJetData = await this.glbLoader.loadAsync(
      "./assets/fighter-jet.glb"
    );
    this.fighterJet = fighterJetData.scene;

    const missileJetData = await this.glbLoader.loadAsync(
      "./assets/missile.glb"
    );
    this.missile = missileJetData.scene;
Once the models are loaded, the scene property of the fighterJetData and missileJetData objects are assigned to this.fighterJet and this.missile, respectively. The scene property represents the root object of the 3D scene that was loaded from the file, which contains all the meshes, materials, and other objects that make up the 3D model.
In the initialize method, let's position, scale, and add the fighterJet to the scene:
    this.fighterJet.position.set(0, -0.5, -3);
    this.fighterJet.scale.set(0.06, 0.06, 0.06);
    this.add(this.fighterJet);
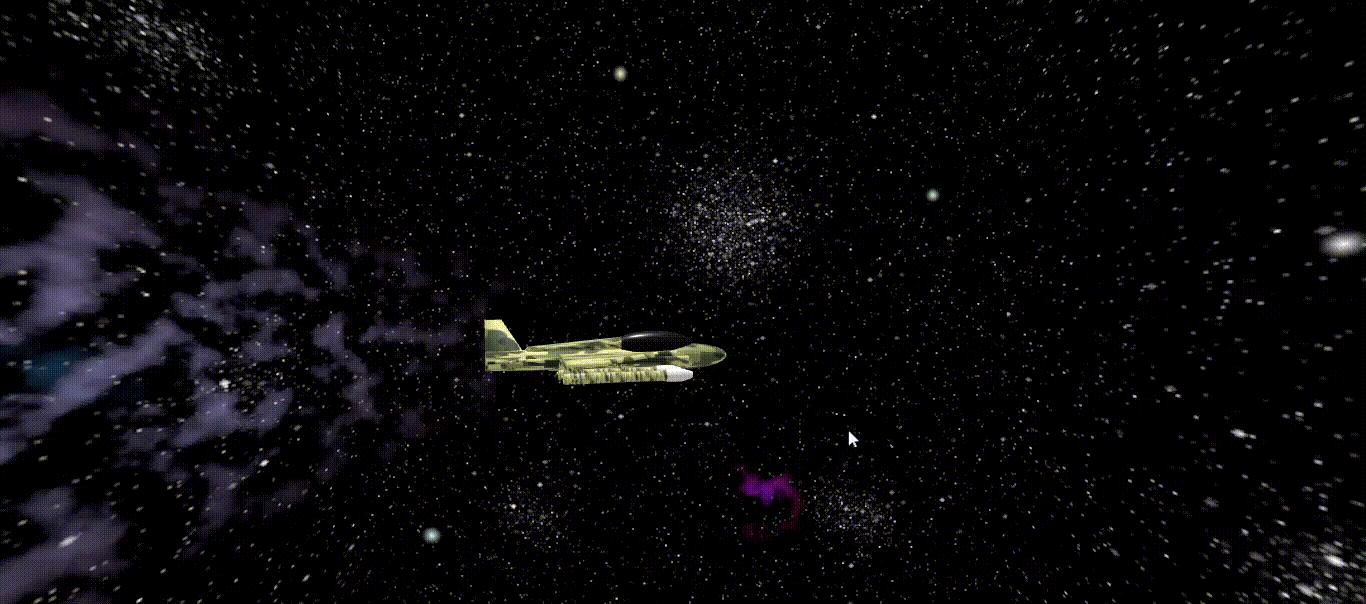
Next, we will animate the jet model by rotating it.
First, import the Clock object from threejs:
import {
  AmbientLight,
  DirectionalLight,
  Scene,
  TextureLoader,
  MeshBasicMaterial,
  BackSide,
  BoxGeometry,
  Mesh,
  Object3D,
  Clock
} from "three";
Then create the following properties:
  private clock = new Clock();
  private delta = 0;
The clock is an instance of the Clock class imported earlier from the Three.js library. it provides a way to measure time in the app.
The delta will store the time elapsed between the current frame and the previous frame in seconds. It will be updated on every frame using the clock instance.
After that, add the following code to the update() method to rotate the jet:
   update() {
    this.delta = this.clock.getDelta();
    this.fighterJet.rotation.y -= 0.5 * this.delta;
  }
The code above updates the rotation of the fighter jet object by modifying its y rotation property. The amount of rotation is determined by multiplying a constant value of 0.5 with the delta time (this.delta). The delta time is used to ensure that the rotation amount is consistent regardless of the frame rate.

Pooling the missiles
In this section, we will implement a missile pool and enable the fighter jet to shoot missiles from it.
Start by creating the following properties in the MainScene class:
  private pooledItem = <Array<Object3D>>[];
  private amountToPool = 200;
The code initializes an empty array named pooledItem to store a collection of Object3D elements, which in this case are missiles. It also sets the amountToPool to 200, indicating the number of missiles to be created and added to the pooledItem array for future use.
Let's create a method called poolMissiles() which will be used to create a pool of missiles.
Add the following method to the MainScene class:
  private poolMissiles() {
    for (let i = 0; i < this.amountToPool; i++) {
      const missile = this.missile.clone();
      missile.scale.set(0.15, 0.15, 0.15);
      missile.position.set(0, 0, 0);
      missile.visible = false;
      this.pooledItem.push(missile);
      this.add(missile);
    }
  }
The poolMissiles() method iterates over the amountToPool which is set to 200, and for each iteration, it clones the missile object which was loaded earlier.
The cloned missile object is then scaled down using scale.set(0.15, 0.15, 0.15) and positioned at the origin (0,0,0) using position.set(0, 0, 0). Its visibility is set to false using visible = false. The cloned and modified missile object is then added to the pooledItem array, and the object is added to the scene using this.add(missile). By the end of the function, there will be 200 invisible missile objects in the pooledItem array, which will be used later in the code.
The poolMissiles method can now be called in the initialize method like this:
this.poolMissiles();
After that, we will create a new private method called getPooledMissile() which will be used to retrieve a missile that is not currently in motion from the pooledItem array:
  private getPooledMissile() {
    for (let i = 0; i < this.amountToPool; i++) {
      if (!this.pooledItem[i].visible) {
        return this.pooledItem[i];
      }
    }
    return null;
  }
The above code iterates through each missile object in the array and checks if it's not visible. If a missile is not visible, it means that it's available for use, so the method returns that missile object. If all missiles are in use, the method returns null, indicating that nothing will happen when an attempt is made to fire a missile. Therefore, it is very important to ensure that an adequate number of objects are pooled.
Next, we will create a code that can load missiles from the pool into the fighter jet launcher and fire them. There are four missile launchers on the fighter jet, and we will use these launchers to fire the missiles.
Add the following private methods to the MainScene class:
  private fireMissileOne() {
    const missile = this.getPooledMissile();
    if (missile) {
      this.fighterJet.attach(missile);
      missile.position.set(5.6, 3.29, 5);
      missile.scale.set(0.15, 0.15, 0.15);
      missile.rotation.set(0, 0, 0);
      missile.visible = true;
      this.attach(missile);
    }
  }
  private fireMissileTwo() {
    const missile = this.getPooledMissile();
    if (missile) {
      this.fighterJet.attach(missile);
      missile.position.set(3.2, 3.29, 5);
      missile.scale.set(0.15, 0.15, 0.15);
      missile.rotation.set(0, 0, 0);
      missile.visible = true;
      this.attach(missile);
    }
  }
  private fireMissileThree() {
    const missile = this.getPooledMissile();
    if (missile) {
      this.fighterJet.attach(missile);
      missile.position.set(-5.6, 3.29, 5);
      missile.scale.set(0.15, 0.15, 0.15);
      missile.rotation.set(0, 0, 0);
      missile.visible = true;
      this.attach(missile);
    }
  }
  private fireMissileFour() {
    const missile = this.getPooledMissile();
    if (missile) {
      this.fighterJet.attach(missile);
      missile.position.set(-3.2, 3.29, 5);
      missile.scale.set(0.15, 0.15, 0.15);
      missile.rotation.set(0, 0, 0);
      missile.visible = true;
      this.attach(missile);
    }
  }
This code defines four private methods, each of which is responsible for firing a missile from a particular missile launcher on the fighter jet. Each method first calls the getPooledMissile() method to get a missile object from the pool, and if it exists, it attaches it to the fighter jet and sets its position, scale, rotation, and visibility before attaching it to the scene. The missile object is obtained from the pool using the getPooledMissile() method, which retrieves a missile object from the pool if it is available, and returns null if no missile is available.
Let's define a new private method called fireMissile which will call the four private methods created earlier: fireMissileOne, fireMissileTwo, fireMissileThree, and fireMissileFour whenever it is invoked.
 private fireMissile() {
    this.fireMissileOne();
    this.fireMissileTwo();
    this.fireMissileThree();
    this.fireMissileFour();
  }
Let's create a new method that will handle the movement of the missiles whenever they are launched. This method will move the missiles in the scene and give them the illusion of flying:
  private moveMissile() {
    for (let i = 0; i < this.amountToPool; i++) {
      if (this.pooledItem[i].visible) {
        this.pooledItem[i].translateZ(-2 * this.delta);
      }
    }
  }
The code defines a method called moveMissile() which is responsible for moving the missile objects in the scene. It does so by iterating over the pooled missiles using a for loop and checking whether each missile is currently visible. If the missile is visible, it is translated along the negative z-axis by a distance of 2 * this.delta.
Next, a new method, named resetMissile(), will be defined to return the missile to the pool after it travels a specific distance:
  private resetMisile() {
    for (let i = 0; i < this.pooledItem.length; i++) {
      if (
        this.pooledItem[i].position.x > 10 ||
        this.pooledItem[i].position.x < -10 ||
        this.pooledItem[i].position.z > 10 ||
        this.pooledItem[i].position.z < -10
      ) {
        this.pooledItem[i].visible = false;
        this.pooledItem[i].position.set(0, 0, 0);
      }
    }
  }
The method above loops through all the active pooled missiles and checks if any of them have traveled beyond a certain distance. If a missile has moved beyond this range, it is reset and returned to the missile pool.
The code checks the position of each missile, and if any of them have an x position greater than 10 or less than -10, or a z position greater than 10 or less than -10, then that missile has traveled too far and needs to be reset.
If a missile needs to be reset, the visible property is set to false, and the missile's position is set back to (0, 0, 0) using the position.set() method. This ensures that the missile is no longer visible in the scene and is ready to be reused again.
Let's call the moveMissile and resetMisile method in the update method:
    this.moveMissile();
    this.resetMisile();
Finally, let's modify the initialize method to trigger the fireMissiles method upon pressing the space key on the keyboard:
    document.onkeydown = (e) => {
      if (e.key === " ") {
        this.fireMissiles();
      }
    };
Summary
Object Pooling is an effective technique used in software development to optimize the performance of applications. It is particularly useful in situations where there is a high demand for creating and destroying objects, as it allows the CPU to focus on more critical tasks. It is a good practice and design pattern used to reduce the processing load on the CPU and improve application performance.
To ensure that the application runs smoothly and effectively, pooling an adequate number of objects is essential. If there are not enough objects in the pool, the user may run out of objects to use, resulting in a poor user experience and reduced functionality.
We have reached the end of this tutorial! If you found this tutorial helpful and informative, you can express your gratitude by giving it a heart on this website and leaving a checky star on the corresponding GitHub repository.
Thank you for taking the time to learn and improve your software development skills 😃.