Learn Fullstack Web Development with React and GraphQL by building a Sticky Note app - Part two
The Back-End Part


Table of contents
- Introduction
- System Requirements
- Prerequisites
- Tools
- Initializing the project
- Installing TypeScript and ts-node-dev
- Setting up the Server
- Code First VS Schema First Approach in GraphQL
- What is Nexus?
- Setting up the Database
- Creating The User Types
- Generating the Schema definition language (SDL) from the User Code
- Verifying a User's JSON Web Tokens
- Testing the GraphQL APIs with Postman
- Testing the signupUser Mutation
- Testing the signinUser Mutation
- Testing the newNote Mutation
- Testing the modifyNote Mutation
- Testing the allNotes Query
- Testing the deleteNote Mutation
- Testing the signoutUser Mutation
- Summary and Next Steps
Introduction
Hello again! This article is the second part of a series titled, "Learn Fullstack Web Development with React and GraphQL by building a Sticky Note app".
In the first part of the series, we built the frontend aspect of this app using React and TypeScript.
In this section, we will to build the backend using GraphQL, Apollo Server 4, Nexus, ExpressJS and MongoDB.
System Requirements
Make sure you already have the following installed:
Prerequisites
This tutorial assumes knowledge of the following:
JavaScript: you are already familiar with ES6 features such as the fat arrow function and object destructuring
TypeScript: You have a little experience with TypeScript or at least know what TypeScript is and why it's being used in place of JavaScript.
NPM: You have used the Node Package Manager to install a library and perhaps also to run your code or start a server.
Tools
We'll be using the following tools to build our GraphQL server.
Nodejs
Mongoose
MongoDB
GraphQL
Expressjs
Apollo Server
Nexus
TypeScript
Initializing the project
Create a new folder called sticky-notes-backend or you can give it any name you prefer. This folder will be used to store all the server files. Open your terminal, and navigate to the newly created folder, then run the following command:
npm init -y
Running the above command will initialize your project with NPM and create package.json file at the root directory of your project.
Installing TypeScript and ts-node-dev
TypeScript is a strongly typed programming language that extends the capabilities of JavaScript with additional features and syntax. Since we are using it for our project, we need to install and configure it first. We also need to install the ts-node-dev library.
The ts-node-dev package will be used for two things:
to transpile our TypeScript code to JavaScript before executing it
to automatically restart the GraphQL dev server whenever a change is made to the code.
Run the following command on your terminal to install them as dev dependencies:
npm install --save-dev typescript@^4.3.5 ts-node-dev@^1.1.8
After the installations, we'll create a new configuration file for TypeScript.
In the root directory of your backend project, create a new file called tsconfig.json.
Open up the tsconfig.json with your editor, then copy and paste the following configurations into it:
{
  "compilerOptions": {
    "target": "ES2018",
    "module": "commonjs",
    "lib": [
      "esnext"
    ],
    "strict": true,
    "rootDir": ".",
    "outDir": "dist",
    "sourceMap": true,
    "esModuleInterop": true
  }
}
We use those options to set the TypeScript Compiler's behavious. For example we used the target option too specify the ECMAScript target version that the code should be compiled to, which is "ES2018" and setting the strict option to true will enforce the compiler to use stricter type checking rules, which can help in catching potential type errors in your code.
Setting up the Server
Installing the necessary Libraries
To install all of the necessary libraries for this project, run the following command in the terminal:
npm install @apollo/server express graphql nexus cors cookie-parser mongoose dotenv jsonwebtoken cookie-parser cors validator bcrypt
Once the installation is finished, use the following command to install the type definitions for the libraries:
npm i --save-dev @types/node @types/jsonwebtoken @types/cors @types/cookie-parser @types/validator @types/bcrypt
Here is a summary of the installed libraries:
@apollo/server: This is the core engine for the Apollo GraphQL server. It provides a set of tools for building a GraphQL server in Node.js.
Express: It is a backend web application framework for building RESTful APIs with Node.js
GraphQL: is the library that implements the core GraphQL parsing and execution algorithms.
Nexus: A code-first, type-safe GraphQL schema construction library for JavaScript/TypeScript. We'll talk more on this and why we are using it later.
Cookie-parser: A middleware that parses cookies attached to the client request object.
Mongoose: A Node.js-based Object Data Modeling (ODM) library for MongoDB.
dotenv: A Node.js library that allows you to load environment variables from a
.envfile into your project.Jsonwebtoken: This library will be used to generate a unique token for an authenticated user.
Cors: is an express middleware that will be used to enable Cross-origin resource sharing on our app.
Validator: will be used to verify the user's details before saving them into the database.
bcrypt: This library will be used to encrypt the user's password before saving them into the database.
Code First VS Schema First Approach in GraphQL
There are two different ways to implement GraphQL API, they are:
Schema First Approach and,
Code First Approach
Schema First
With this approach, the schema is defined first using the Schema Definition Language (SDL) before implementing the resolver functions. This method is also referred to as SDL-first Approach.
Code First
The Code first approach allows developers to use their programming language of choice (TypeScript in our case) to define the schema, which can be more expressive and easier to read and maintain than Schema Definition Language.
We will be using the code-first approach in this project.
What is Nexus?
Nexus is a code-first, type-safe GraphQL schema construction library for JavaScript and TypeScript. It is a powerful tool that can be used to build and deploy GraphQL servers in JavaScript/TypeScript more efficiently.
Setting up Nexus
At the root directory of the project, create a new folder called src. Inside the src directory, create two new TypeScript files named schema.ts and index.ts.
The schema.ts file will be used for generating our GraphQL schema with Nexus. The index.ts file will be used to setup our GraphQL web server with Apollo server and express.
Inside src/schema.ts file, type in the following code:
import { makeSchema } from 'nexus'
import { join } from 'path'

export const schema = makeSchema({
  types: [],
  outputs: {
    schema: join(process.cwd(), "schema.graphql"),
    typegen: join(process.cwd(), "nexus-typegen.ts"),
  },
})
The
types:[]will contain GraphQL types that will be used to generate our GraphQL schema, it is empty for now. Soon, we will create the types and replace the empty array with them.The
schema: join(process.cwd(), "schema.graphql")will configure Nexus to generate aschema.graphqlfile at the root directory of our project where nexus will automatically write the SDL version of our GraphQL schema.The
typegen: join(process.cwd(), "nexus-typegen.ts")will set up nexus to generatenexus-typegen.tsfile at the root directory of our project where nexus should write the generated TypeScript definition types derived from our schema.
Let's run the following command in the terminal and see what happens next:
npx ts-node --transpile-only src/schema
After executing the script above, Nexus will automatically generate two new files in the root directory of your project, they are: schema.graphql and nexus-typegen.ts.
The schema.graphql file has a type named Query, with a single field called ok because we did not provide Nexus with more information about the types we wanted in the schema, this was constructed as a default schema.
Let's add a generate script to the package.json file:
"generate": "ts-node --transpile-only src/schema.ts"
Any time you run npn run generate on your terminal, it will regenerate your schema by updating the schema.graphql and nexus-typegen.ts file if there are any changes in your Nexus code.
Setting up the Apollo GraphQL Server with Express.js
There are different ways to create an Apollo Server. This tutorial uses Apollo Server as a middleware with express.js, there's also a tutorial that uses the Apollo Server's startStandaloneServer on Apollo's website.
In this situation, it is not recommended to use the startStandaloneServer function because we want to be able to customize the CORS' behavior and run the cookieParser middleware before processing the GraphQL requests.
Open up the src/index.ts file we created earlier, and add the following codes to it:
import express, { Response } from "express";
import { expressMiddleware } from '@apollo/server/express4';
import { ApolloServer } from '@apollo/server';

import { ApolloServerPluginDrainHttpServer } from '@apollo/server/plugin/drainHttpServer';
import http from 'http';
import { schema } from "./schema";
import cors from 'cors';
import cookieParser from "cookie-parser";
import { json } from 'body-parser';

require('dotenv').config()


async function startApolloServer() {
  const app = express();

   const corsOptions = {
    origin: process.env.FRONTEND_URL!,
    credentials: true,
  };

  const httpServer = http.createServer(app);

  const server = new ApolloServer({
    schema,
    plugins: [ApolloServerPluginDrainHttpServer({ httpServer })],
  });

  await server.start();
  app.use(
    '/graphql',
    cors(corsOptions),
    json(),
    cookieParser(),
    expressMiddleware(server, {
      context: async ({ res }:{ res:Response })=> {
        return {
          res
        }
      }
    })
  );
  await new Promise<void>((resolve) => httpServer.listen({ port: 4000 }, resolve));
  console.log(`🚀 Server ready at http://localhost:4000/graphql`);
}

startApolloServer();
Understanding what is going on in the server file:
We created a function called startApolloServer. This is the function that will be called anytime we want to start the server. Inside the function, we created an instance of express() called app.
After that, we created a new object called corsOptions. Inside the corsOptions we set the origin to our front-end URL meaning only the requests from the front-end URL will be allowed. This will protect our GraphQL server from being accessed from an unknown origin.
The credentials: true option will set the [Access-Control-Allow-Credentials](developer.mozilla.org/en-US/docs/Web/HTTP/H.. option to true. This will enable the browser to read the cookies that will be sent to it from the server.
The const httpServer = http.createServer(app); creates a new HTTP server and passes Express.js (app) as a callback to handle HTTP requests.
The app.use(cookieParser()); is used to register cookieParser as an express middleware function. Middleware functions are functions that have access to the request object (req), the response object (res), and the next middleware function in the application’s request-response cycle.
The cookieParser() function will be used to parse the cookies sent from the user's browser. More about cookies and why they are being used will be discussed in the authentication part of this tutorial.
We used the following snippets:
const server = new ApolloServer({
    schema,
    plugins: [ApolloServerPluginDrainHttpServer({ httpServer })]
  });
to create an instance of ApolloServer and passed the schema that we created earlier, and the ApolloServerPluginDrainHttpServer object to it. We used the ApolloServerPluginDrainHttpServer plugin to ensure the server gracefully shuts down.
We used the following snippets:
  app.use(
    cors(corsOptions),
    json(),
    cookieParser(),
       expressMiddleware(server, {
      context: async ({ res }:{ res:Response })=> {
        return {
          res
        }
      }
    }),
    '/graphql'
  )
to register cors(), json(), cookieParser(), expressMiddleware() as an express middleware function.
The expressMiddleware() function enables us to attach the Apollo Server to the Express server as a middleware function. It also has a second optional argument which is an object that contains a context function. The context function will return an object (res in this case and req later in this tutorial) which will be shared by all the resolvers during the executions of an operation. We will see more of context and resolvers in action later in this tutorial.
The /graphql registered to the middleware will set the /graphql URL path as the default part of our server. This will enable us to access our server only on the following path: http://localhost:4000/graphql
In the package.json file, add the following dev script to it.
"dev": "ts-node-dev --transpile-only --no-notify --exit-child src/index.ts"
Now we can run the following command to start the backend development server:
npm run dev
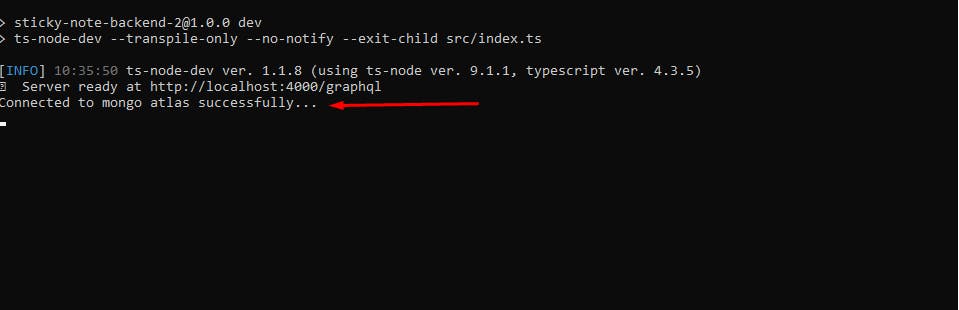
Once the server has started running, we should see something like this on the CLI:

When you visit http://localhost:4000/graphql on your browser:
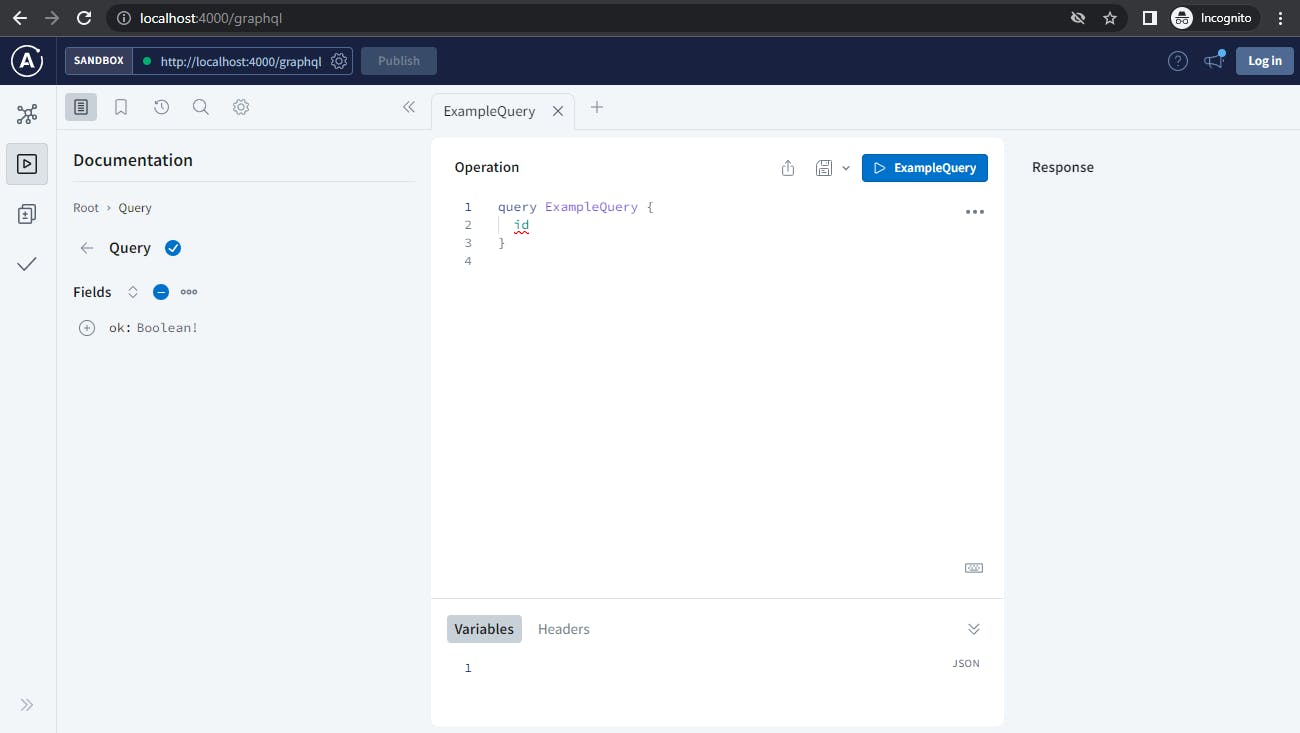
You'll notice that Apollo no longer uses GraphQL Playground and is now using Apollo Sandbox, as the standard landing page in Apollo Server 4.
Additionally, you need an internet connection to view http://localhost:4000/graphql on your browser.
Setting up the Database
We'll be using MongoDB Atlass for this tutorial. MongoDB Atlas is a fast, easy, and free way to get started with MongoDB. Signup on the MongoDB website to get your database URI string.
The URI string will be used to connect to your database. It looks like this: mongodb+srv://<username>:<password>@<cluster-name>yocfhhk.mongodb.net/?retryWrites=true&w=majority.
You can follow this guide on freecodecamp's website on how to set up your MongoDB Atlas account and get your MongoDB database URI string.
Creating the environment variables
At the root directory of your project, create a .env file. Open it in your editor and add your MongoDB URI string to it like this:
DATABASE_URL='Your-MongoDB-URL-String-goes-here'
That's all for now, later in the article, we'll be adding our JWT_SECRET and FRONTEND_URL to the .env file.
Connecting to the Database
Open up the server file in src/index.ts and import the mongoose object.
import mongoose from 'mongoose';
After that, we will create a new function called connectToMongoDB.
async function connectToMongoDB() {
  await mongoose.connect(process.env.DATABASE_URL!);
  console.log("Connected to Mongo atlas successfully...");
}
Then call the connectToMongoDB() function inside the startApolloServer() like so:
  console.log(`🚀 Server ready at http://localhost:4000/graphql`);
  connectToMongoDB().catch(err => console.log(err));
}
Run the following command on your terminal to start your server
npm run dev
When the server starts, it should automatically establish a connection to your database URI if everything goes according to plan.
An internet connection is required to connect to the MongoDB Atlas.
Creating the models
In this part, we will define the structure of our database for the users and their sticky notes with Mongoose.
Mongoose is an Object Data Modeling (ODM) library for MongoDB and Node.js. It provides a simple and straightforward way to interact with MongoDB databases from a Node.js application, allowing you to work with your data as native JavaScript objects.
Defining the User Model
Create a new directory in the src folder named: models. Open the models folder and create a new file named: user.ts inside it.
Open up the user.ts file and add the following code to it:
import { Schema, model } from 'mongoose';

interface IUser {
  id:string;
  fullname: string;
  username: string;
  email: string;
  password: string;
}

const userSchema = new Schema<IUser>({
  email: {
    type: String,
    required: true,
    unique: true,
  },
  username: {
    type: String,
    unique: true,
    required: true,
    trim: true,
  },
  password: {
    type: String,
    required: true,
  },
  fullname: {
    type: String,
    required: true,
    trim: true,
  },
});


const User = model<IUser>('User', userSchema);

export default User;
First, we created an interface called IUser that will represent a user in our database, then we defined a userSchema that conformed with the IUser interface before generating a User model from the userSchema .
The User model can then be used to create, read, update, and delete documents in the users collection in the database.
Defining The Notes Model
Create another file named note.ts in the src/models directory, and add the following code:
import { Schema, model, Document } from 'mongoose';

enum Theme {
    Yellow = "yellow",
    Green = "green",
    Pink = "pink",
    Purple = "purple",
    Blue = "blue",
    Gray = "gray",
    Charcoal = "charcoal"
}

interface INote {
    content: string;
    color: Theme;
    userId: string;
}

const noteSchema = new Schema<INote>({
    content: {
        type: String,
        required: true
    },
    color: {
        type: String,
        enum: ['yellow', 'green', 'pink', 'purple', 'blue', 'gray', 'charcoal'],
        default: Theme.Yellow
    },
    userId: {
        type: String, required: true
    },
});

const Note = model<INote>('Note', noteSchema);
export default Note;
We used the TypeScript's enum type to define all the colors that are available for use on the note app, and created an interface for the note called INote.
Then we defined a noteSchema that corresponds with the INote interface before generating a Note model from the noteSchema.
After that, we exported the model for later use. We also used the Mongoose enum type to specify the accepted colors (enum: ['yellow', 'green', 'pink', 'purple', 'blue', 'gray', 'charcoal'],), any other color than those listed will be rejected.
Creating The User Types
Create a new folder in the src directory called graphql. Inside the graphql directory, create a new TypeScript file called User.ts and open it up in your editor, then import the following objects into it:
import bcrypt from "bcrypt";
import jsonwebtoken from "jsonwebtoken";
import {GraphQLError }  from "graphql"
import validator from 'validator';
import { extendType, objectType, inputObjectType, nonNull } from "nexus";
import userModel from "../models/user";
Before we proceed, let's quickly go through the imports:
The
bcryptsobject will be used to encrypt the user's password before saving it to the database.jsonwebtokenwill be used to generate a safe token that will be used to authenticate a user after successful registration or login.GraphQLErrorwill be used to specify HTTP status code when throwing a GraphQL error.validatorwill be used to validate user inputs before saving them into the database.extendTypewill be used to extend the GraphQL root types in this project.objectTypewill be used to define our object types.inputObjectTypewill be used to define the object type that will be passed as an input value.the
nonNullfunction will be used to prevent the return value of a type from being empty
Defining the types for a User
Remember we are using the code-first approach to build our GraphQL server, which means we have to write our schemas in TypeScript then later, we'll use Nexus to generate the Schema Definition Language from our code. Let's define the following types for a user:
UserAuthPayLoadSignupUserInputSignInUserInput
Add the following snippets below the imports to create the User type:
 const User = objectType({
    name: "User",
    definition(t) {
      t.nonNull.string("id");
      t.nonNull.string("email");
      t.nonNull.string("username");
      t.nonNull.string("password");
      t.nonNull.string("fullname");
    },
  });
We used the Nexus objectType function to create a new type called User. The User type will be used to retrieve the user's data from the server. Five fields are defined in the User object types, they are: id, email, username, password and fullname. Each field is defined as a non-nullable string type.
Defining the AuthPayLoad Type
Let's create another object type called AuthPayLoad. This type will be used to retrieve a user's token and data after successful registration or login.
Add the following code below the User object type:
   const AuthPayLoad = objectType({
    name: "AuthPayLoad",
    definition(t) {
      t.nonNull.string("token");
      t.nonNull.field("user", { type: User });
    },
  });
The AuthPayLoad type contains two fields: token and user. The token field is defined as non-nullable string type while the user field is defined as the non-nullable User type we created previously.
Defining the SignupUserInput Type
We will define a new input object type that will be used to collect user's data anytime they want to register for a new account.
Add the following code below the AuthPayLoad type:
   const SignupUserInput = inputObjectType({
    name: "SignupUserInput",
    definition(t) {
      t.nonNull.string("email");
      t.nonNull.string("username");
      t.nonNull.string("password");
      t.nonNull.string("fullname");
    },
  });
We used Nexus inputObjectType function to create a new input object type called SignupUserInput. Then we defined the following fields inside the SignupUserInput type: id, email, username, password and fullname. Each field is defined as a non-nullable string type.
Defining the SigninUserInput Type
Below the SignupUserInput type, let's create another input object type and name it SigninUserInput which will be used to collect login details from a user:
   const SignInUserInput = inputObjectType({
    name: "SignInUserInput",
    definition(t) {
      t.nonNull.string("usernameOrEmail");
      t.nonNull.string("password");
    },
  });
Within the SigninUserInput type, we defined two fields: usernameOrEmail and password and they are both defined as non-nullable string type.
The Special Root Operation Types in GraphQL
In GraphQL, there are three special root operation types, they are: query, mutation, and subscription. These operation types represent the entry points for executing operations in the GraphQL API.
Query Type
The Query type is used for read-only operations, such as retrieving data from the server. You can define fields on the Query type to allow clients to request specific pieces of data from the server.
Mutation Type
The Mutation type is used for write operations, such as creating, updating, or deleting data. You can define fields on the Mutation type to allow clients to make changes to the data stored on the server.
Subscription Type
The Subscription type is used for long-lived connections that allow the server to push updates to the client in real-time. You can define fields on the Subscription type to allow clients to subscribe to specific types of updates.
Signing Up A New User
To sign up a new user, we will create a new type called SignupUser that will be used to register them.
Let's add the following snippets below the SignInUserInput type:
  export const SignupUser = extendType({
    type: 'Mutation',
    definition(t) {
      t.nonNull.field('signupUser', {
        type: AuthPayLoad,
        args: {
          data: nonNull(SignupUserInput)
        },
        async resolve(_parent, args, { res }, _info) {
          const { data: { email, username, password, fullname } } = args;

          if (!validator.isEmail(email)) {
            throw new GraphQLError('Please enter a valid E-mail!', {
              extensions: {
                code: 'UNAUTHENTICATED',
                http: { status: 401 },
              }
            });
          }
          if (!validator.isLength(password, { min: 5 })) {

            throw new GraphQLError('Password must have atleast 5 characters', {
              extensions: {
                code: 'UNAUTHENTICATED',
                http: { status: 401 },
              }
            });
          }
          if (!validator.isLength(username, { min: 3 })) {
            throw new GraphQLError('username must have at least 3 characters', {
              extensions: {
                code: 'UNAUTHENTICATED',
                http: { status: 401 },
              }
            });
          }
          if (!validator.isLength(fullname, { min: 4 })) {
            throw new GraphQLError('fullname have atleast 4 characters', {
              extensions: {
                code: 'UNAUTHENTICATED',
                http: { status: 401 },
              }
            });
          }

          const encryptedPassword = bcrypt.hashSync(password, 10);
          const userData = {
            email: email.toLowerCase(),
            username: username.toLowerCase(),
            fullname,
            password: encryptedPassword,
          };
          try {
            const usernameExist = await userModel.findOne({ username: username.toLowerCase() });
            if (usernameExist) {
              throw new GraphQLError('Username is already in use!', {
                extensions: {
                  code: 'UNAUTHENTICATED',
                  http: { status: 401 },
                }
              });
            }
            const emailExist = await userModel.findOne({ email: email.toLowerCase() });
            if (emailExist) {
              throw new GraphQLError('Email is already in use!', {
                extensions: {
                  code: 'UNAUTHENTICATED',
                  http: { status: 401 },
                }
              });
            }
            const createdUser = await userModel.create(userData);
            console.log(createdUser)
            const token = jsonwebtoken.sign(
              {
                id: createdUser._id,
                username: createdUser.username,
                exp: Math.floor(Date.now() / 1000) + 60 * 60 * 24,
              },
              process.env.JWT_SECRET!
            );
            res
               .cookie("access_token", token, {
                httpOnly: true,
                secure:  process.env.SECURE_COOKIE === 'true'? true : false,
                maxAge: Math.floor(Date.now() / 1000) + (60 * 60 * 24),
                sameSite: 'none'
               })
            return {
              user: createdUser,
              token,
            };
          } catch (error) {
            throw error
          }
        },
      })
    }
  });
Demystifying the SignupUser code
In the following snippets:
 export const SignupUser = extendType({
    type: 'Mutation',
    definition(t) {
      t.nonNull.field('signupUser', {
        type: AuthPayLoad,
        args: {
          data: nonNull(SignupUserInput)
        },
We defined a new field called
signupUserthat extends the GraphQL rootMutationroot type.the return type for the
signupUsermutation was defined as theAuthPayLoadtype we created previously.then we defined the expected argument as
dataobject whose value is expected to be a non-nullableSignupUserInputobject type that will be passed to thesignupUserfield.
In the snippet below:
async resolve(_parent, args, { res }, _info) {
          const { data: { email, username, password, fullname } } = args;

          if (!validator.isEmail(email)) {
            throw new GraphQLError('Please enter a valid E-mail!', {
              extensions: {
                code: 'UNAUTHENTICATED',
                http: { status: 401 },
              }
            });
          }
          if (!validator.isLength(password, { min: 5 })) {

            throw new GraphQLError('Password must have atleast 5 characters', {
              extensions: {
                code: 'UNAUTHENTICATED',
                http: { status: 401 },
              }
            });
          }
          if (!validator.isLength(username, { min: 3 })) {
            throw new GraphQLError('username must have at least 3 characters', {
              extensions: {
                code: 'UNAUTHENTICATED',
                http: { status: 401 },
              }
            });
          }
          if (!validator.isLength(fullname, { min: 4 })) {
            throw new GraphQLError('fullname have atleast 4 characters', {
              extensions: {
                code: 'UNAUTHENTICATED',
                http: { status: 401 },
              }
            });
          }
We created a resolver function called
resolvefor thesignupUserfield.In GraphQL, a resolver function is a function that is used to resolve the value for a field in the GraphQL schema. It is responsible for fetching the data for a specific field from the database and can also be used to perform other tasks, such as data validation. Resolver function can optionally accept four positional arguments. They are
parent,args,context, andinfoarranged in that order.
The
parentis the return value of the resolver for this field's parent.The
argsis the GraphQL arguments provided for this field.The
contextis used for sharing data that the resolvers might need. We created this function earlier in the server file and then passed the express response object (res) to it. Theresobject will be made available to all theresolverfunctions through thecontextobject.
You might have noticed the {res} instead of context in the signupUser resolver function arguments, that is because we unpacked the context parameter using Object Destructuring method.
Instead of having the context in the parameters, and then later doing something like this:
const res = context.res
Or this:
const {res} = context
We just unpacked the res object directly in the arguments.
- The
infocontains details on the present status of the operation.
The underscore (_) was used to prefix _parent and _info parameters to bypass the linter error because they are unused. We don't need the parent and info parameters now, removing them will cause an error because the four parameters are expected in that position, and not using them will result to the linter warning us about unused parameters. To fix all of the above problems, we prefixed the unused parameters with an underscore (_).
In thefollowing line:
const { data: { email, username, password, fullname } } = args;
we unpacked the email, username, password, fullname from the data object passed into the args. We could also remove the args object from the resolve's argument like we did with the context and do something like this:
async resolve(_parent, { data: { email, username, password, fullname } }, { res }, _info) {
...
But doing so would only make the resolver arguments longer.
In the following snippets:
          if (!validator.isEmail(email)) {
            throw new GraphQLError('Please enter a valid E-mail!', {
              extensions: {
                code: 'UNAUTHENTICATED',
                http: { status: 401 },
              }
            });
          }
          if (!validator.isLength(password, { min: 5 })) {

            throw new GraphQLError('Password must have atleast 5 characters', {
              extensions: {
                code: 'UNAUTHENTICATED',
                http: { status: 401 },
              }
            });
          }
          if (!validator.isLength(username, { min: 3 })) {
            throw new GraphQLError('username must have at least 3 characters', {
              extensions: {
                code: 'UNAUTHENTICATED',
                http: { status: 401 },
              }
            });
          }
          if (!validator.isLength(fullname, { min: 4 })) {
            throw new GraphQLError('fullname have atleast 4 characters', {
              extensions: {
                code: 'UNAUTHENTICATED',
                http: { status: 401 },
              }
            });
          }
We used the validator library to verify the email, password, username and the fullname details provided by the user, and throw an UNAUTHENTICATED error using the GraphQLError library whenever the validations fail.
In the following code:
const encryptedPassword = bcrypt.hashSync(password, 10);
          const userData = {
            email: email.toLowerCase(),
            username: username.toLowerCase(),
            fullname,
            password: encryptedPassword,
          };
We encrypted the user's password using the bcrypt library. Then creates a userData object that stores the email, username, fullname and the encrypted password data.
In the following snippets:
try {
            const usernameExist = await userModel.findOne({ username: username.toLowerCase() });
            if (usernameExist) {
              throw new GraphQLError('Username is already in use!', {
                extensions: {
                  code: 'UNAUTHENTICATED',
                  http: { status: 401 },
                }
              });
            }
            const emailExist = await userModel.findOne({ email: email.toLowerCase() });
            if (emailExist) {
              throw new GraphQLError('Email is already in use!', {
                extensions: {
                  code: 'UNAUTHENTICATED',
                  http: { status: 401 },
                }
              });
            }
            const createdUser = await userModel.create(userData);

            const token = jsonwebtoken.sign(
              {
                id: createdUser._id,
                username: createdUser.username,
                exp: Math.floor(Date.now() / 1000) + 60 * 60 * 24,
              },
              process.env.JWT_SECRET!
            );
            res
               .cookie("access_token", token, {
                httpOnly: true,
                secure:  process.env.SECURE_COOKIE === 'true'? true : false,
                maxAge: Math.floor(Date.now() / 1000) + (60 * 60 * 24),
                sameSite: 'none'
               })
            return {
              user: createdUser,
              token,
            };
          } catch (error) {
            throw error
          }
        },
      })
    }
  });
We checked if the username exist already in the database by executing the following query:
const usernameExist = await userModel.findOne({ username: username.toLowerCase() });
If the usernameExist, we'll throw the Username is already in use error message. We also verified if the user's email address exists in the database by running the following query:
const emailExist = await userModel.findOne({ email: email.toLowerCase() });
If emailExist value is truthy, we'll return Email is already in use error to the user.
Then we created the user using the data stored in the userData's variable by running the following query:
const createdUser = await userModel.create(userData);
We used the jsonwebtoken library with a secret key (we'll create the key very soon) to generate a secure token from the created user data using the following snippet:
            const token = jsonwebtoken.sign(
              {
                id: createdUser._id,
                username: createdUser.username,
                exp: Math.floor(Date.now() / 1000) + 60 * 60 * 24,
              },
              process.env.JWT_SECRET!
            );
By default, when we create a new document in MongoDB, mongoose automatically adds an _id field that acts as a primary key. That was how we came about createdUser._id. To create your JWT secret key, open up the .env file and add the following below the DATABASE_URL :
DATABASE_URL='Your-MongoDB-URL-String-goes-here'
JWT_SECRET = 'Your-JWT_SECRET-goes-here'
Note that your JWT secret key is private to you, it must be very difficult to guess and must be secured. Whenever the server receives a JWT from the user's computer, the JWT_SECRET will be used to decrypt the user's token. We'll discuss more about how the authentication work soon.
In the following snippets:
res
               .cookie("access_token", token, {
                httpOnly: true,
                secure:  process.env.SECURE_COOKIE === 'true'? true : false,
                maxAge: Math.floor(Date.now() / 1000) + (60 * 60 * 24),
                sameSite: 'none'
               })
            return {
              user: createdUser,
              token,
            };
We used the res object in express to store the tokens on the user's web browser using HTTP cookies. In part three of this tutorial, we will configure the browser to send the cookies back to the server anytime the user is making an API request.
We added some attributes to the cookie so that the browser will know how to handle the cookies when it receives them. Below are what they are:
httpOnly: Setting this attribute totruewill prevent the cookie from being accessed by JavaScript. The aim of this is to prevent XSS Attack on our app.secure: Setting this attribute totrueis used to indicate to the browser that the cookies should only be transmitted over a secure (encrypted) connection. This will keep our app secure and prevent the Man in the middle (MITM) attack on it. Add the following to your.envfile:SECURE_COOKIE= trueThe value of this attribute must be set to
trueif thesameSiteattribute isnone.maxAge: The maximum lifetime of the cookie before it expires, I set it to 24 hourssameSite: This option will only allow the cookie to be sent to the same domain name. I set it tononebecause the front end and the back end of this app will be hosted on different domains.
Authenticating the User
A user needs to be authenticated anytime they make an API request to our GraphQL server. If not, we will have to keep redirecting the user to the login page and have them enter their username and password every time they want to perform any operation like fetching all notes, modifying and deleting them to confirm their identity.
Nobody should have to go through that stress. We need a secure way to authenticate a user each time they make an API request to the server and this is why we are using a token-based authentication system.
What is a Token-Based Authentication System?
Token-Based Authentication is a secure way of verifying a user's identity using encrypted security tokens. Once the token has been generated after the initial logins, the token will be shared between the user's computer and the server rather than having the user re-enter their credentials every time they need to make a request to the server.
How does it work?
The user logins or signup for a new account
The server verifies the user's credentials
If the credentials are confirmed, the server generates a secure token using JSON Web Token(JWT)
The tokens are then placed on the user's computer (We used a Cookie with the
HttpOnly.) attribute for this app)The next time a user makes an API request to access secured data from the browser, the JWT tokens will be attached to the request.
The server then verifies the user's token before allowing the user to perform any operations.
If the tokens are confirmed, access will be granted to the user
Why use Cookies with HttpOnly attribute to store JSON Web Tokens?
Using HTML Web Storage to save the user's token is considered a bad idea because it makes the website vulnerable to XSS attack. An attacker can have access to an authenticated user's token by injecting JavaScript code that will run on the user's website. When Cookies are used with the HttpOnly attribute, they will not be accessible with JavaScript thereby making them invulnerable to XSS attack.
However, they can still be susceptible to Cross Site Request Forgery (CSRF) attack if we did not restrict access to the cookies by setting the HttpOnly, secure and SameSite flag.
Signing In the User
To sign in a user, let's create a SigninUser type. This type will be used to login a verified user.
Add the following code below the SignupUser object inside the src/graphql/User.ts file:
    export const SigninUser = extendType({
    type: 'Mutation',
    definition(t) {
      t.nonNull.field('signinUser', {
        type: AuthPayLoad,
        args: {
         data: nonNull(
          SignInUserInput
         ),
        },
        async resolve(_parent, args, { res }, _info) {
         try {
           const { data: { usernameOrEmail, password } } = args

           const userFound = await userModel.findOne({
             $or: [{ email: usernameOrEmail.toLowerCase() },
             { username: usernameOrEmail.toLowerCase() }],
           }).exec();
           if (!userFound) {
             throw new GraphQLError('User does not exist', {
              extensions: {
                code: 'UNAUTHENTICATED',
                http: { status: 401 },
              }
            });
           }
           if (bcrypt.compareSync(password, userFound.password)) {
             const username = userFound.username;
             const id = userFound._id;
             const token = jsonwebtoken.sign({
               id,
               username,
               exp: Math.floor(Date.now() / 1000) + (60 * 60 * 24),
             }, process.env.JWT_SECRET!);
             res
               .cookie("access_token", token, {
                 httpOnly: true,
                 secure:  true,
                 maxAge: Math.floor(Date.now() / 1000) + (60 * 60 * 24),
                 sameSite: 'none'
               })
             return {
               user: userFound,
               token,
             };
           }
           throw new GraphQLError('Incorrect password', {
            extensions: {
              code: 'UNAUTHENTICATED',
              http: { status: 401 },
            }
          });
         }
         catch (error: any) {
           throw new GraphQLError(error, {
            extensions: {
              code: 'UNAUTHENTICATED',
              http: { status: 401 },
            }
          });
         }
       }
     })
    }
  });
Demystifying the SigninUser code
We created a new field called signinUser. Just like the signupUser field, it extends the GraphQL Mutation root type and returns a non-nullable AuthPayLoad type. It also has a non-nullable argument of SignInUserInput type.
Then we created a resolver function called resolve for the signinUser mutation. Inside the resolve function, we unpacked the usernameOrEmail and password arguments using object destructuring, then we checked if the usernameOrEmail exists in the database by running the following query:
const userFound = await userModel.findOne({
             $or: [{ email: usernameOrEmail.toLowerCase() },
             { username: usernameOrEmail.toLowerCase() }],
           }).exec();
A user can use their username or email to log in. The query will select one document where either the username field value is equal to usernameOrEmail or email field value is equal to usernameOrEmail. The query result will be saved into the userFound variable. If the userFound value is falsy, we'll throw a new GraphQLError that says: 'User does not exist'.
If the userFound value is not falsy, we'll compare the password in the database with the user's entered password using the bcrypt library. Once the password is confirmed, a new token will be generated with the user's id and username . After that, the generated token will be sent to the client's computer via cookies.
But if the user's password in the database does not match the entered password, then a GraphQLError that says: 'Incorrect password' will be returned to the user.
Logging Out The User
To log the user out is very easy, all we have to do is delete the user's token from the cookies. Without the token, a user will have to login again to access their data.
Let's write the following code below the SigninUser object in src/graphql/User.ts:
  export const LogoutUser = extendType({
    type: "Mutation",
    definition(t) {
      t.nonNull.field("signoutUser", {
        type: "Boolean",
        async resolve (_parent, _args, { res }, _info) {
         res.clearCookie("access_token")
          return true
        },
      });
    },
  });
We created a new field that extends the Mutation root type called signoutUser. The return type for this field is defined as Boolean. Then we created a new resolver function called resolve. What this function does is very simple. It clears the access_token cookies, then returns a true boolean value to the client.
Generating the Schema definition language (SDL) from the User Code
In this part, we are going to use Nexus to generate the GraphQL schema from all the user's code we've been writing.
Create a new TypeScript file named index.ts in scr/graphql/, then add the following export to it:
export * from "./User";
update src/schema.ts file to use all the imports coming from scr/graphql/index.ts:
import { makeSchema } from 'nexus'
import { join } from 'path'
import * as types from "./graphql";
export const schema = makeSchema({
  types,
  outputs: {
    schema: join(process.cwd(), "schema.graphql"),
    typegen: join(process.cwd(), "nexus-typegen.ts"),
  },
})
First, we imported everything in scr/graphql/index.ts file as types using the following snippets:
import * as types from "./graphql";
Then we update the makeSchema method to use the imported types instead of the empty array ([]) that was there before with the following snippets:
export const schema = makeSchema({
  types, // same as: types:types
...
Open up the schema.graphql file at the root directory of your project, If your terminal is still running on the dev server you should see that the file has been automatically updated:
### This file was generated by Nexus Schema
### Do not make changes to this file directly


type AuthPayLoad {
  token: String!
  user: User!
}

type Mutation {
  signinUser(data: SignInUserInput!): AuthPayLoad!
  signupUser(data: SignupUserInput!): AuthPayLoad!
}

type Query {
  ok: Boolean!
}

input SignInUserInput {
  password: String!
  usernameOrEmail: String!
}

input SignupUserInput {
  email: String!
  fullname: String!
  password: String!
  username: String!
}

type User {
  email: String!
  fullname: String!
  id: String!
  password: String!
  username: String!
}
If you open the nexus-typegen.ts file, you should see something like this too:
/**
 * This file was generated by Nexus Schema
 * Do not make changes to this file directly
 */


declare global {
  interface NexusGen extends NexusGenTypes {}
}

export interface NexusGenInputs {
  SignInUserInput: { // input type
    password: string; // String!
    usernameOrEmail: string; // String!
  }
  SignupUserInput: { // input type
    email: string; // String!
    fullname: string; // String!
    password: string; // String!
    username: string; // String!
  }
}

export interface NexusGenEnums {
}

export interface NexusGenScalars {
  String: string
  Int: number
  Float: number
  Boolean: boolean
  ID: string
}

export interface NexusGenObjects {
  AuthPayLoad: { // root type
    token: string; // String!
    user: NexusGenRootTypes['User']; // User!
  }
  Mutation: {};
  Query: {};
  User: { // root type
    email: string; // String!
    fullname: string; // String!
    id: string; // String!
    password: string; // String!
    username: string; // String!
  }
}

export interface NexusGenInterfaces {
}

export interface NexusGenUnions {
}

export type NexusGenRootTypes = NexusGenObjects

export type NexusGenAllTypes = NexusGenRootTypes & NexusGenScalars

export interface NexusGenFieldTypes {
  AuthPayLoad: { // field return type
    token: string; // String!
    user: NexusGenRootTypes['User']; // User!
  }
  Mutation: { // field return type
    signinUser: NexusGenRootTypes['AuthPayLoad']; // AuthPayLoad!
    signupUser: NexusGenRootTypes['AuthPayLoad']; // AuthPayLoad!
  }
  Query: { // field return type
    ok: boolean; // Boolean!
  }
  User: { // field return type
    email: string; // String!
    fullname: string; // String!
    id: string; // String!
    password: string; // String!
    username: string; // String!
  }
}

export interface NexusGenFieldTypeNames {
  AuthPayLoad: { // field return type name
    token: 'String'
    user: 'User'
  }
  Mutation: { // field return type name
    signinUser: 'AuthPayLoad'
    signupUser: 'AuthPayLoad'
  }
  Query: { // field return type name
    ok: 'Boolean'
  }
  User: { // field return type name
    email: 'String'
    fullname: 'String'
    id: 'String'
    password: 'String'
    username: 'String'
  }
}

export interface NexusGenArgTypes {
  Mutation: {
    signinUser: { // args
      data: NexusGenInputs['SignInUserInput']; // SignInUserInput!
    }
    signupUser: { // args
      data: NexusGenInputs['SignupUserInput']; // SignupUserInput!
    }
  }
}

export interface NexusGenAbstractTypeMembers {
}

export interface NexusGenTypeInterfaces {
}

export type NexusGenObjectNames = keyof NexusGenObjects;

export type NexusGenInputNames = keyof NexusGenInputs;

export type NexusGenEnumNames = never;

export type NexusGenInterfaceNames = never;

export type NexusGenScalarNames = keyof NexusGenScalars;

export type NexusGenUnionNames = never;

export type NexusGenObjectsUsingAbstractStrategyIsTypeOf = never;

export type NexusGenAbstractsUsingStrategyResolveType = never;

export type NexusGenFeaturesConfig = {
  abstractTypeStrategies: {
    isTypeOf: false
    resolveType: true
    __typename: false
  }
}

export interface NexusGenTypes {
  context: any;
  inputTypes: NexusGenInputs;
  rootTypes: NexusGenRootTypes;
  inputTypeShapes: NexusGenInputs & NexusGenEnums & NexusGenScalars;
  argTypes: NexusGenArgTypes;
  fieldTypes: NexusGenFieldTypes;
  fieldTypeNames: NexusGenFieldTypeNames;
  allTypes: NexusGenAllTypes;
  typeInterfaces: NexusGenTypeInterfaces;
  objectNames: NexusGenObjectNames;
  inputNames: NexusGenInputNames;
  enumNames: NexusGenEnumNames;
  interfaceNames: NexusGenInterfaceNames;
  scalarNames: NexusGenScalarNames;
  unionNames: NexusGenUnionNames;
  allInputTypes: NexusGenTypes['inputNames'] | NexusGenTypes['enumNames'] | NexusGenTypes['scalarNames'];
  allOutputTypes: NexusGenTypes['objectNames'] | NexusGenTypes['enumNames'] | NexusGenTypes['unionNames'] | NexusGenTypes['interfaceNames'] | NexusGenTypes['scalarNames'];
  allNamedTypes: NexusGenTypes['allInputTypes'] | NexusGenTypes['allOutputTypes']
  abstractTypes: NexusGenTypes['interfaceNames'] | NexusGenTypes['unionNames'];
  abstractTypeMembers: NexusGenAbstractTypeMembers;
  objectsUsingAbstractStrategyIsTypeOf: NexusGenObjectsUsingAbstractStrategyIsTypeOf;
  abstractsUsingStrategyResolveType: NexusGenAbstractsUsingStrategyResolveType;
  features: NexusGenFeaturesConfig;
}


declare global {
  interface NexusGenPluginTypeConfig<TypeName extends string> {
  }
  interface NexusGenPluginInputTypeConfig<TypeName extends string> {
  }
  interface NexusGenPluginFieldConfig<TypeName extends string, FieldName extends string> {
  }
  interface NexusGenPluginInputFieldConfig<TypeName extends string, FieldName extends string> {
  }
  interface NexusGenPluginSchemaConfig {
  }
  interface NexusGenPluginArgConfig {
  }
}
If the file has not been updated, you might need to restart your server by running the following command:
npm run dev
Or you can run the generate script if you don't feel like starting the server to update the code:
npm run generate
Verifying a User's JSON Web Tokens
Before we can create a new note or make any modifications to it, we need to verify the owner of the note first. We will be verifying the owner by decrypting the owner's JSON Web Tokens. The decrypted JWT contains the user's id and username.
The id will be used to uniquely identify each user and their sticky notes. The user will be able to create, fetch, edit, and delete any notes that belong to them using the id.
Open up the src/index.ts file and import the jsonwebtoken library:
import jsonwebtoken from 'jsonwebtoken'
After the import, we'll create a new function that verifies the user's token right above the startApolloServer() function:
const getUser = (token: string, res: Response) => {
  try {
    if (token) {
      return jsonwebtoken.verify(token, process.env.JWT_SECRET!)
    }
    res.clearCookie("access_token");
    return null
  } catch (error) {
    return null
  }
}
The getUser function takes a user's token and the Express response object as parameters, then verifies and returns the user's token.
Null will be returned if either no token was supplied or if an error occurred while verifying the user's token.
Now, let's update the context object to return the decoded JWT so that it can be used in the resolver function:
      context: async ({ req, res }:{req:Request, res:Response})=> {
        if (req) {
          const token = req.cookies.access_token || ""
          const user = getUser(token, res);
          return {
            user,
            res
          };
        }
        return {
          res
        }
      }
If a request is sent to our GraphQL server, we will get the tokens from the request cookies using req.cookies.access_token or return an empty string("") if non was found using:
req.cookies.access_token || ""
We stored the decoded tokens into the user variable. Both the user and res object will be sent to the context object whenever a user makes a request to the server; otherwise, we'll simply return only the res object.
Let's update the express import to include the Request object:
import express, { Response, Request } from "express";
Defining the Types for the Sticky Note
Let's create a new file in src/graphql called Note.ts and import the following objects into it:
import { extendType, objectType, inputObjectType, nonNull } from "nexus";
import noteModel from './../models/note';
import {GraphQLError}  from "graphql"
We've already discussed what extendType, objectType, inputObjectType, nonNull and GraphQLError are used for when we are creating the User types. In the second line, we imported the noteModel we created previously.
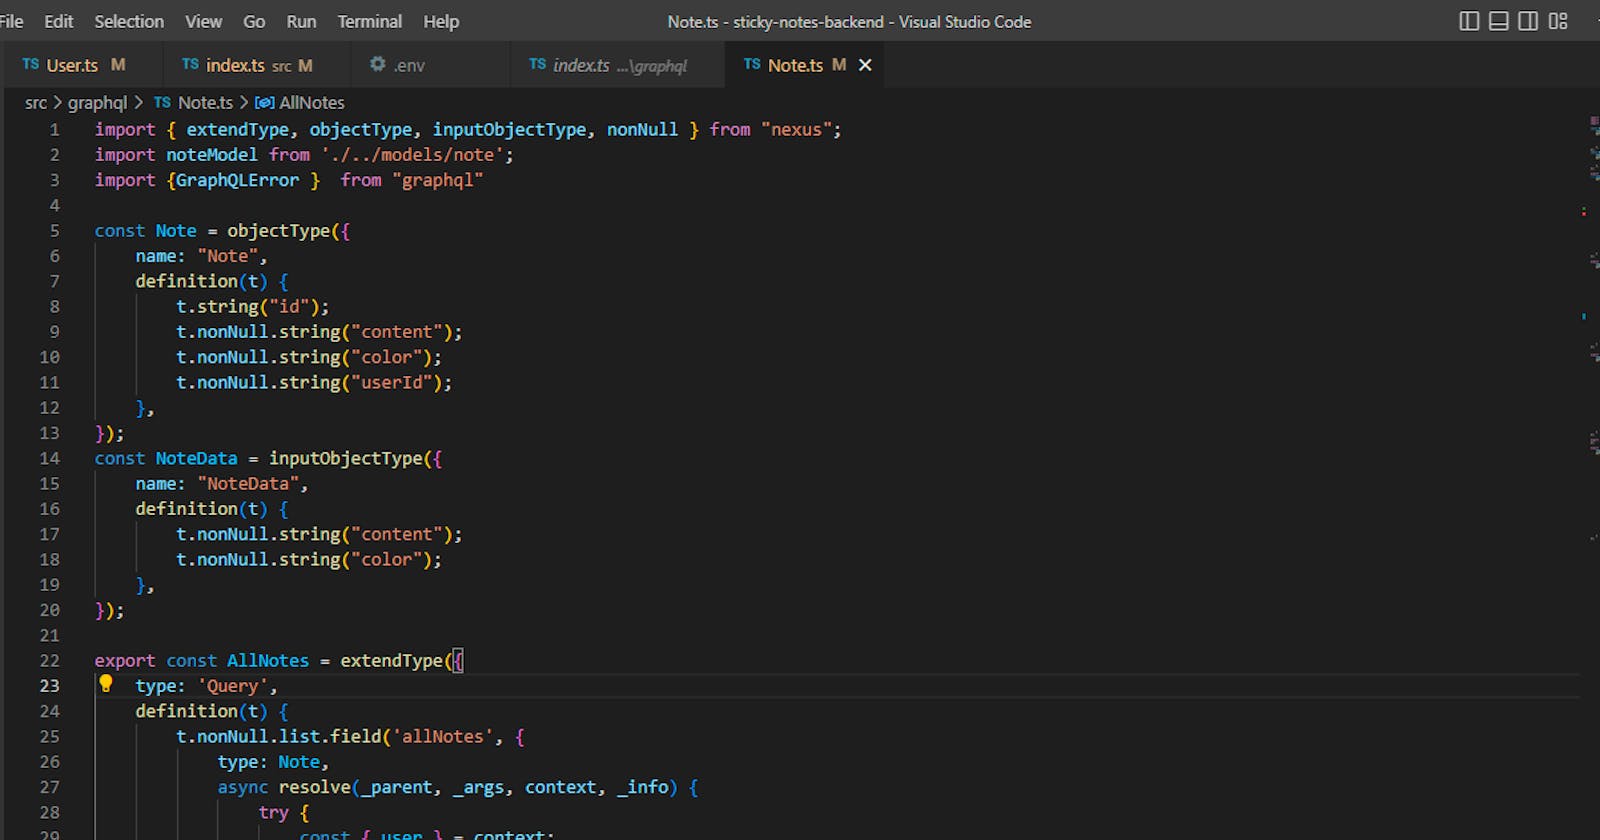
Below the imports, let's create a new objectType called Note and a new inputObjectType called NoteData.
const Note = objectType({
    name: "Note",
    definition(t) {
        t.string("id");
        t.nonNull.string("content");
        t.nonNull.string("color");
        t.nonNull.string("userId");
    },
});
const NoteData = inputObjectType({
    name: "NoteData",
    definition(t) {
        t.nonNull.string("content");
        t.nonNull.string("color");
    },
});
The Note type has the following fields: id, content, color, and userId that can be used to query the notes.
Also, we defined the following fields: content and color in the NoteData type. Both fields have non-nullable string type.
Fetching All Notes Belonging to a User
In this part, we will create our first GraphQL query that will be used to fetch every note that belongs to a user.
Type the following code below the NoteData object.
export const AllNotes = extendType({
    type: 'Query',
    definition(t) {
        t.nonNull.list.field('allNotes', {
            type: Note,
            async resolve(_parent, _args, context, _info) {
                try {
                    const { user } = context;
                    if (!user) {
                        throw new GraphQLError('You are not authenticated', {
                            extensions: {
                              code: 'UNAUTHENTICATED',
                              http: { status: 401 },
                            }
                          });
                    }
                    const notes = await noteModel.find(
                        {
                            userId: user.id,
                        }
                    );
                    console.log(notes)
                    return notes;
                }
                catch (error) {
                    throw error;
                }
            }
        })
    }
});
Using the Nexus extendType function, we extended the GraphQL query root type and added a new root field to it called allNotes. This time, we extended the GraphQL query root type instead of the mutation type because we are only fetching from the database and no modifications will be made to the note data.
We defined the return type of the query as an array of the Note type we created previously. Then we created a resolver function for the allNotes query named resolve. We performed all the operations that fetch the user's note inside the resolver function.
The context is the only argument we're using on this field's resolver function, so we prefixed _parent, _args, and _info with an underscore(_). Using the object destructuring method, we unpacked the user object that was passed down to the resolver via the context object.
In the following snippets:
if (!user) {
    throw new GraphQLError('You are not authenticated', {
       extensions: {
          code: 'UNAUTHENTICATED',
             http: { status: 401 },
                }
             });
          }
We checked if the user object passed down from context is valid. Remember, we returned a falsy value if the token is empty or not successfully decoded, and we returned the user if the token was successful in the getUser function.
If the user value is falsy, we will throw an UNAUTHENTICATED error, but if the user is valid, then we will fetch all the notes that belong to the user by executing the following Mongoose query:
 const notes = await noteModel.find(
                     {
                            userId: user.id,
                        }
                    );
The query above will search for all the notes whose userId matches the id of the user that is currently logged in, then stores the results into the notes variable.
Fetching a Single Note
Let's create another query that will be used to fetch a single note for an authenticated user. The user will have to provide the id of the note to be fetched. Add the following code below the AllNotes type:
export const SingleNote = extendType({
    type: 'Query',
    definition(t) {
        t.nonNull.field('singleNote', {
            type: Note,
            args: {
                noteId: 'String',
            },
            async resolve(_parent, args, context, _info) {
                const { noteId } = args;
                const { user } = context;
                const userId = user.id
                if (!user) {
                    throw new GraphQLError('You are not authenticated', {
                        extensions: {
                          code: 'UNAUTHENTICATED',
                          http: { status: 401 },
                        }
                      });
                }
                try {
                    const noteDetails = await noteModel.findOne({ _id: noteId, userId });
                    if(!noteDetails){
                        throw new Error("Note not found");
                    }
                    return noteDetails;
                } catch (error) {
                    throw error;
                }
            },
        })
    }
});
We extended the Query root type again and added a new root field to it called singleNote. After that, we defined the return type of the singleNote query as a non-nullable Note objectType. Also, we defined the expected argument for the singleNote query (noteId) as a string. Then we created a resolver function named resolve that query the database for the note.
We used the following query:
const noteDetails = await noteModel.findOne({ _id: noteId, userId });
to fetch the first note that matches the id and the userId provided then stores the query result into noteDetails variable. We used the following snippets to throw a not found error if the note was not found:
if(!noteDetails){
                        throw new Error("Note not found");
                    }
Creating A New Note
Now that we are done implementing the singleNote query, let's create our first mutation for the sticky note by adding a new type that will be used to create a new note.
Type the following code below the SingleNote type:
export const NewNote = extendType({
    type: 'Mutation',
    definition(t) {
        t.nonNull.field('newNote', {
            type: Note,
            args: {
                data: nonNull(NoteData)
            },
            async resolve(_parent, args, context, _info) {
                const { data } = args;
                const { user } = context;
                try {
                    if (!user) {
                        throw new GraphQLError('You are not authenticated', {
                            extensions: {
                              code: 'UNAUTHENTICATED',
                              http: { status: 401 },
                            }
                          });
                    }
                    const createdNoted = await noteModel.create({
                        content: data.content, color: data.color || 'yellow', userId: user.id
                    });
                    return createdNoted;
                } catch (error) {
                    throw error;
                }
            }
        })
    }
});
We extended the Mutation root type and added a new root field to it called newNote. Then we defined the return type of the newNote mutation as non-nullable Note type. Also, we defined the expected argument as a non-nullable noteData type. After that, we created a resolver function that creates the user's note if the user is authenticated.
We used the following queries:
const createdNoted = await noteModel.create({
                        content: data.content, color: data.color || 'yellow', userId: user.id
                    });
to create a new note document with the provided content, color and userId by using the create() function in Mongoose.
The data.color || 'yellow' means yellow will be used as the default color if the color args wasn't provided.
Modifying an existing Note
In this part, we are going to create a new type that edits an existing note belonging to a user. To know the specific note that the user wants to modify, the note id must be provided as an argument.
Let's add the following code below the NewNote type.
export const ModifyNote = extendType({
    type: 'Mutation',
    definition(t) {
        t.nonNull.field('modifyNote', {
            type: Note,
            args: {
                noteId: nonNull('String'),
                data: nonNull(NoteData)
            },
            async resolve(_parent, args, context, _info) {
                const { noteId, data: { content, color } } = args;
                const { user } = context;
                if (!user) {
                    throw new GraphQLError('You are not authenticated', {
                        extensions: {
                          code: 'UNAUTHENTICATED',
                          http: { status: 401 },
                        }
                      });
                }
                try {
                    const modifiedNote = await noteModel.findOneAndUpdate(
                        {
                            _id: noteId, userId: user.id,
                        },
                        { content, color },
                        {
                            runValidators: true,
                            new: true,
                        }
                    );
                    if (!modifiedNote) {
                        throw new Error("Unable to update note");
                    }
                    console.log(modifiedNote)
                    return modifiedNote;
                } catch (error) {
                    throw error;
                }
            }
        })
    }
});
Here's the summary of what we did in the code above:
We created a new field called
modifyNotethat extends the GraphQLMutationroot type.We defined
Notetype as the return type for the fieldwe defined
noteIdanddataas the expected argument for themodifyNotemutation. ThenoteIdwill be used used to search for the specific note that a user wants to modify. The notedatawill be used to make changes to the note when found.The
noteIdargument is a non-nullableStringwhile the type for thedataargument is non-nullableNoteDatatype.We created a resolver function named
resolve.The resolver function checks if a user is authenticated, then modifies the user's note if the user is confirmed.
The following query:
 const modifiedNote = await noteModel.findOneAndUpdate(
                        {
                            _id: noteId, userId: user.id,
                        },
                        { content, color },
                        {
                            runValidators: true,
                            new: true,
                        }
                    );
uses the
findOneAndUpdatefunction in Mongoose to search for the first note that matches thenoteIdanduserIdprovided in the arguments.by default, Mongoose does not run validation on updates. We need to set the
runValidatorsoption totrueevery time we call thefindOneAndUpdateor anyupdatemethod to run the update validators on the query.also by default,
findOneAndUpdatedoes not return the updated document, it returns the document as it was before the update was applied. Setting thenewoption totruewill return the updated document instead of the old document.we saved the result of the query to
modifiedNotevariable.Then return the
modifiedNoteif the update was successful or throw theUnable to update noteerror if it wasn't.
Deleting a Note
Let's perform the final mutation on this app by creating a new type that deletes a user's note. Only notes that the user has added can be deleted. To delete a note, the noteId must be provided.
Type the following code below the ModifyNote type:
export const DeleteNote = extendType({
    type: 'Mutation',
    definition(t) {
        t.nonNull.field('deleteNote', {
            type: Note,
            args: {
                noteId: nonNull('String')
            },
            async resolve(_parent, args, context, _info) {
                const { noteId } = args;
                const { user } = context;
                if (!user) {
                    throw new GraphQLError('You are not authenticated', {
                        extensions: {
                          code: 'UNAUTHENTICATED',
                          http: { status: 401 },
                        }
                      });
                }
                try {
                    const deletedNote = await noteModel.findOneAndDelete({
                        _id: noteId,
                        userId: user.id,
                    });
                    if (!deletedNote) {
                        throw new Error(" Note not found");
                    }
                    return deletedNote;
                } catch (error) {
                    throw error;
                }
            },
        })
    }
});
We extended the
Mutationroot type and added a new root field to it calleddeleteNoteThe return type for the
deleteNotefield is defined as non-nullableNotetype.We also defined the
noteIdas the expected argument for thedeleteNotemutationthe
noteIdhas a non-nullableStringtypeWe created a resolver function named
resolve.The resolver function deletes the note after verifying the user
the following query:
const deletedNote = await noteModel.findOneAndDelete({
                        _id: noteId,
                        userId: user.id,
                    });
searches for the first note that matches the noteId and the userId, deletes it, and then stores the deleted note into the deletedNote variable.
We return an error if the delete wasn't successful
or return the deleted note if the note was successfully removed from the database.
Generating the Note Schemas with Nexus
Let's connect all our exported note types to the makeSchema function. Open the src/graphql/index.ts file and add the following code below the user export that was there before:
export * from "./Note";
So everything looks like this:
export * from "./User";
export * from "./Note";
If we check the schema.graphql file now, we will notice that all the note types we created earlier have been converted to GraphQL schemas by Nexus:
### This file was generated by Nexus Schema
### Do not make changes to this file directly


type AuthPayLoad {
  token: String!
  user: User!
}

type Mutation {
  deleteNote(noteId: String!): Note!
  modifyNote(data: NoteData!, noteId: String!): Note!
  newNote(data: NoteData!): Note!
  signinUser(data: SignInUserInput!): AuthPayLoad!
  signupUser(data: SignupUserInput!): AuthPayLoad!
}

type Note {
  color: String!
  content: String!
  id: String
  userId: String!
}

input NoteData {
  color: String!
  content: String!
}

type Query {
  allNotes: [Note]!
  singleNote(noteId: String): Note!
}

input SignInUserInput {
  password: String!
  usernameOrEmail: String!
}

input SignupUserInput {
  email: String!
  fullname: String!
  password: String!
  username: String!
}

type User {
  email: String!
  fullname: String!
  id: String!
  password: String!
  username: String!
}
These are the GraphQL Schema Definition Language (SDL) codes that were generated by Nexus from the User and Note type codes that we wrote previously.
The AuthPayLoad type represents the payload that is returned when a user successfully signs in or signs up. It has two fields: token (which is a string representing an authentication token) and user (which is an object of type User).
The Note type represents a note object. It has four fields: id, content, color, and userId.
The NoteData input type represents the data that is passed as an argument to the newNote and modifyNote mutations. It has two fields: content and color.
The SignInUserInput and SignupUserInput input types represent the data that is passed as an argument to the signinUser and signupUser mutations. They have different fields, depending on the information that is needed to sign in or sign up.
The User type represents a user object. It has five fields: id, email, fullname, password, and username.
The Mutation type represents the root type for GraphQL mutations in this API. It has five fields: deleteNote, modifyNote, newNote, signinUser, and signupUser each of which corresponds to a different mutation that can be performed.
The Query type represents the root type for GraphQL queries in this API. It has two fields: allNotes and singleNote.
Testing the GraphQL APIs with Postman
One of the easiest and fastest ways to test our GraphQL API endpoints locally is through Postman. Postman is a powerful software for testing API requests, inspecting their responses, and easily debugging them. Click here to download and install it if you don't have it already.
Changing the Secure Cookie Attribute to false for testing purposes only
We need to modify a few settings specifically for these tests in order to test our APIs.
Open the .env file and change the SECURE_COOKIE from true to false. Without changing it, Postman will not send the cookies along with the request any time an authenticated user tries to access a secure endpoint (or maybe Postman sent it but the server rejected).
Changing the setting like that will make our website vulnerable, but we are only doing this for testing our API in development mode only. During production, the secure attribute must be set back to true because we set the sameSite attribute to none. Doing this is one of many ways to prevent Cross-site request forgery on the website.
Testing the signupUser Mutation
Launch your Postman and make sure your development server is running already at http://localhost:4000/graphql. If it isn't, run the following command to start it:
npm run dev
Create a new collection by clicking on the Collections tab, then click on the plus icon. You will be prompted to give your collection a name, let's name it Sticky Notes for now. You can rename it later if you prefer. Right-click on the created Sticky Notes collection or click on the three dots option button on it, then select Add request from the drop-down options. Name the request SignupUser. After that, change the request method from GET to POST. The Post request method is the method we are going to use throughout our test.
Enter http://localhost:4000/graphql in the URL text box. Below the URL textbox, select Body from the options tab, then select the GraphQL radio button.
After that, you will be presented with two text-area boxes named: QUERY and GRAPHQL VARIABLES.
Type the following queries into the QUERY box:
mutation SignupUser($data: SignupUserInput!) {
  signupUser(data: $data) {
    token
    user {
      email
      fullname
      id
      password
      username
    }
  }
}
And type the following into GRAPHQL VARIABLES
{
  "data": {
    "email": "janedoe@email.com",
    "fullname": "Jane Doe",
    "password": "invisible",
    "username": "janedoe"
  }
}
Then click on the Send button
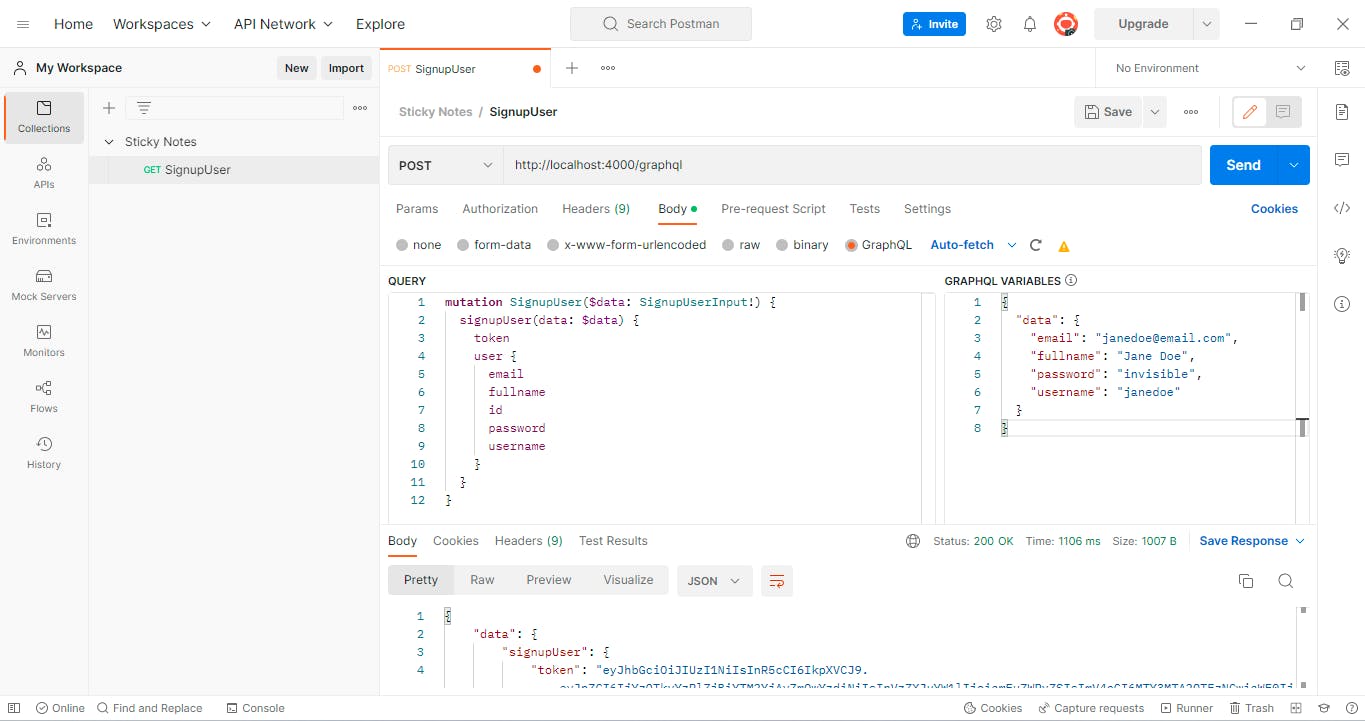
After a successful registration, click on the Cookies below the Send button, you will see the access_token cookies sent from our GraphQL server. This token will be automatically attached to every request from now until we signout or maybe when it expires.
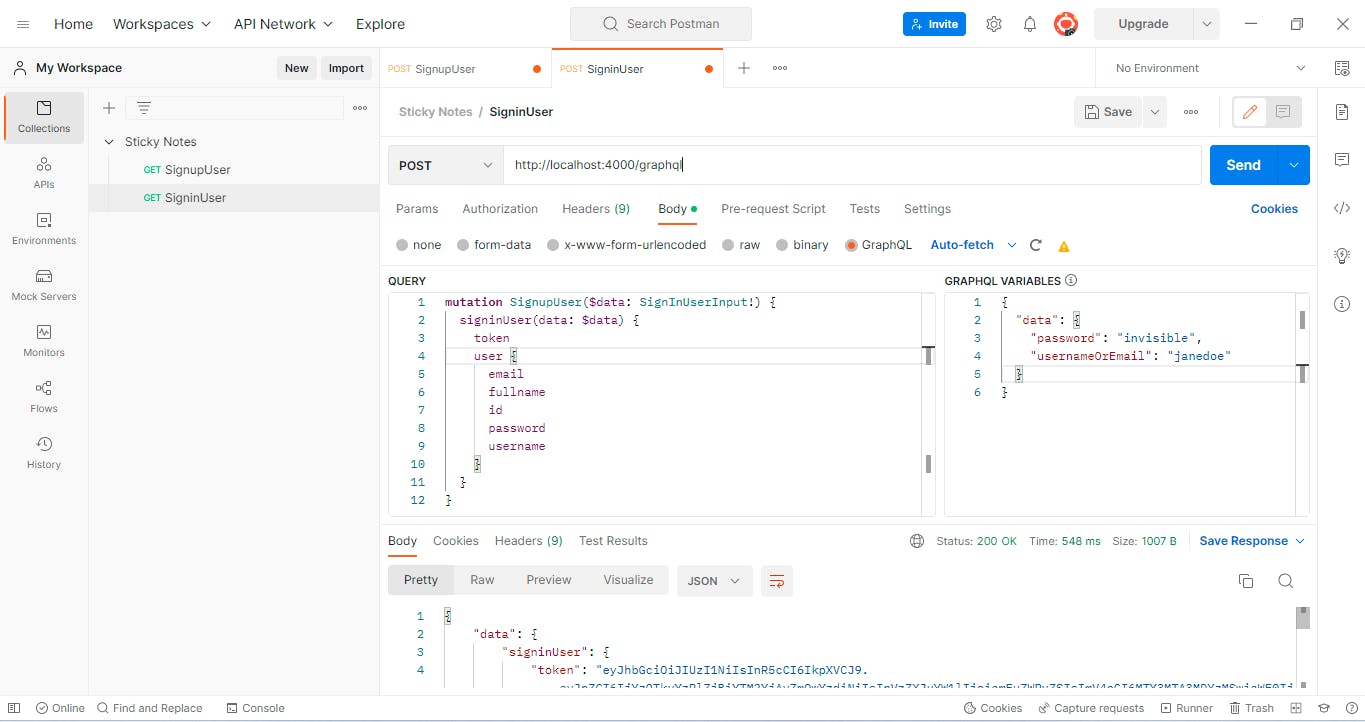
Testing the signinUser Mutation
To test the signinUser mutation, we'll add another request to the Sticky Notes collection and name it SigninUser. Then change the request method from GET to POST, and enter http://localhost:4000/graphql in the URL textbox. Select Body in the options tab below the URL textbox, then check the GraphQL radio button.
Type the following queries into the QUERY box:
mutation SignupUser($data: SignInUserInput!) {
  signinUser(data: $data) {
    token
    user {
      email
      fullname
      id
      password
      username
    }
  }
}
And type the following into the GRAPHQL VARIABLES:
{
  "data": {
    "password": "invisible",
    "usernameOrEmail": "janedoe"
  }
}
Then click on the Send button:
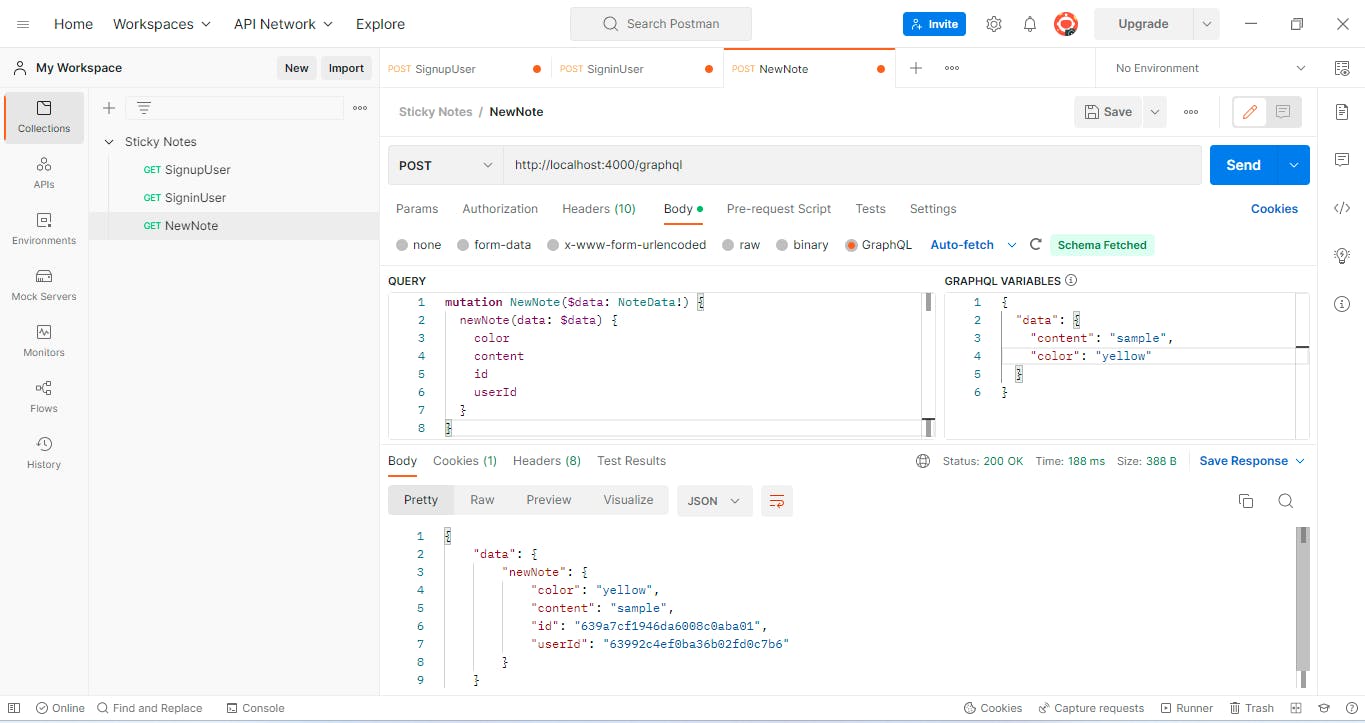
Testing the newNote Mutation
To test the NewNote mutation, we'll go through the same process we've been following since, we'll add another request to the Sticky Notes collection and name it NewNote. Then change the request method from GET to POST, and enter http://localhost:4000/graphql in the URL textbox. Select Body in the options tab below the URL textbox, then check the GraphQL radio button.
Type the following queries into the QUERY box:
mutation NewNote($data: NoteData!) {
  newNote(data: $data) {
    color
    content
    id
    userId
  }
}
GRAPHQL VARIABLES:
{
  "data": {
    "content": "sample",
    "color": "yellow"
  }
}
Testing the modifyNote Mutation
Add another request to the Sticky Notes collection and name it ModifyNote . Then change the request method from GET to POST, and enter http://localhost:4000/graphql in the URL textbox. Select Body in the options tab below the URL textbox, then check the GraphQL radio button.
Type the following queries into the QUERY box:
mutation ModifyNote($noteId: String!, $data: NoteData!) {
  modifyNote(noteId: $noteId, data: $data) {
    color
    content
    id
    userId
  }
}
GRAPHQL VARIABLES:
  {  "noteId": "639a7cf1946da6008c0aba01",
  "data": {
    "content": "Note sample modified",
    "color": "green"
  }
}

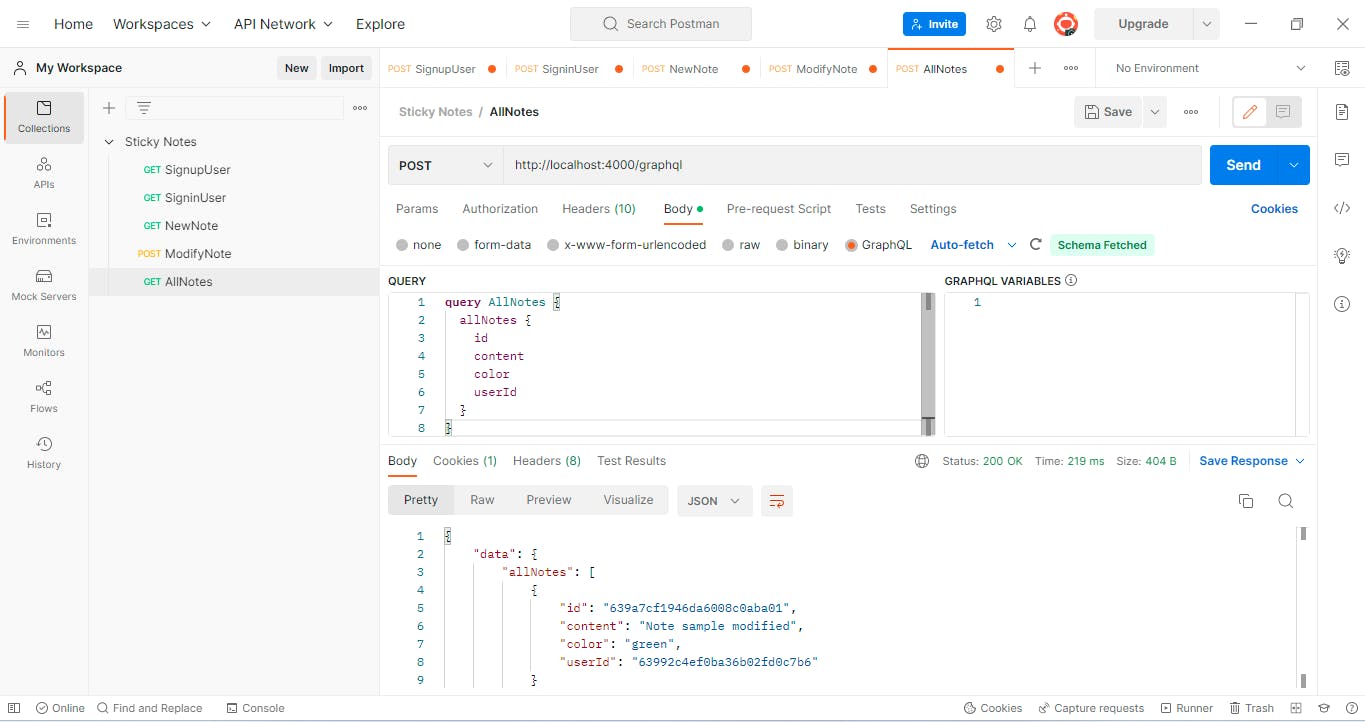
Testing the allNotes Query
To fetch all the sticky notes belonging to a user, add another request to the Sticky Notes collection and name it AllNotes. Then change the request method from GET to POST, and enter http://localhost:4000/graphql in the URL textbox. Select Body in the options tab below the URL textbox, then check the GraphQL radio button.
Type the following queries into the QUERY box:
query AllNotes {
  allNotes {
    id
    content
    color
    userId
  }
}
Testing the deleteNote Mutation
To delete a note, add another request to the Sticky Notes collection and name it DeleteNote. Then change the request method from GET to POST, and enter http://localhost:4000/graphql in the URL textbox. Select Body in the options tab below the URL textbox, then check the GraphQL radio button.
Type the following queries into the QUERY box:
mutation Mutation($noteId: String!) {
  deleteNote(noteId: $noteId) {
    color
    content
    userId
    id
  }
}
GRAPHQL VARIABLES:
{
  "noteId": "639a7cf1946da6008c0aba01"
}
Testing the signoutUser Mutation
To test the signoutUser Mutation, add another request to the Sticky Notes collection and name it DeleteNote. Then change the request method from GET to POST, and enter http://localhost:4000/graphql in the URL textbox. Select Body in the options tab below the URL textbox, then check the GraphQL radio button.
Type the following queries into the QUERY box:
mutation signoutUser {
  signoutUser
}
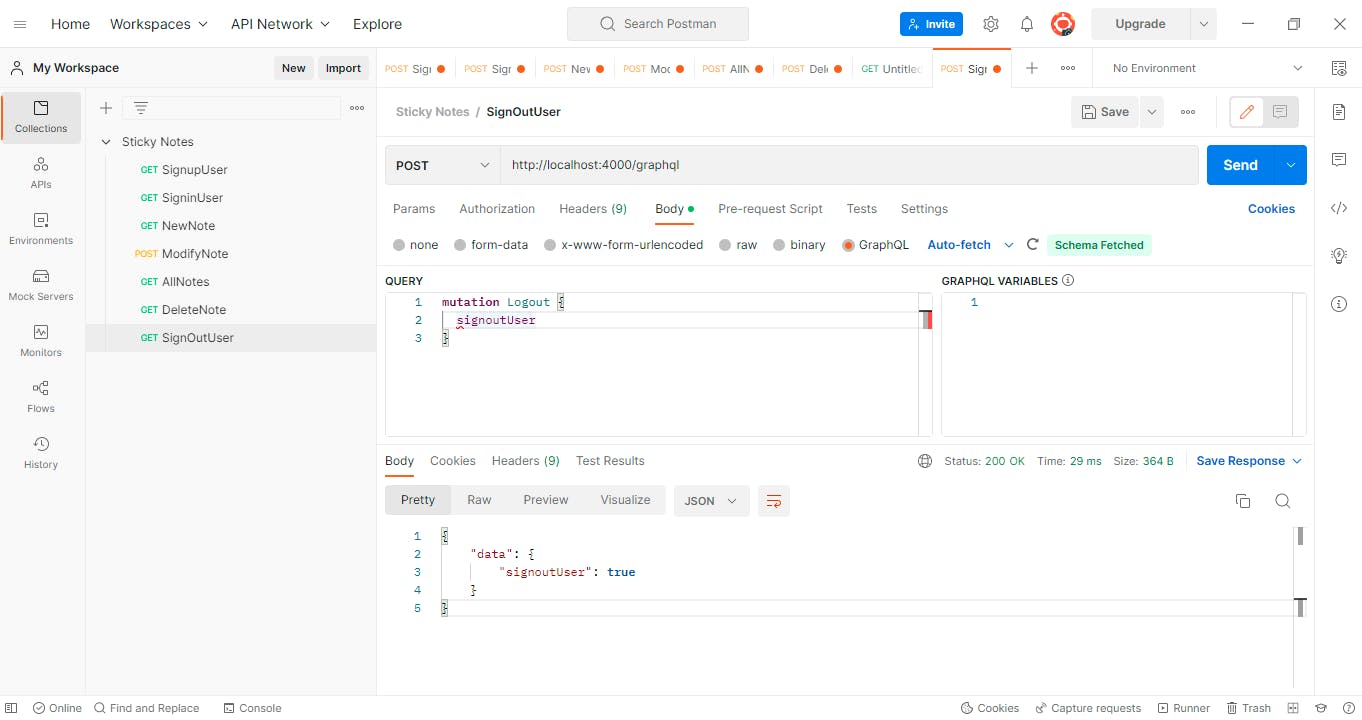
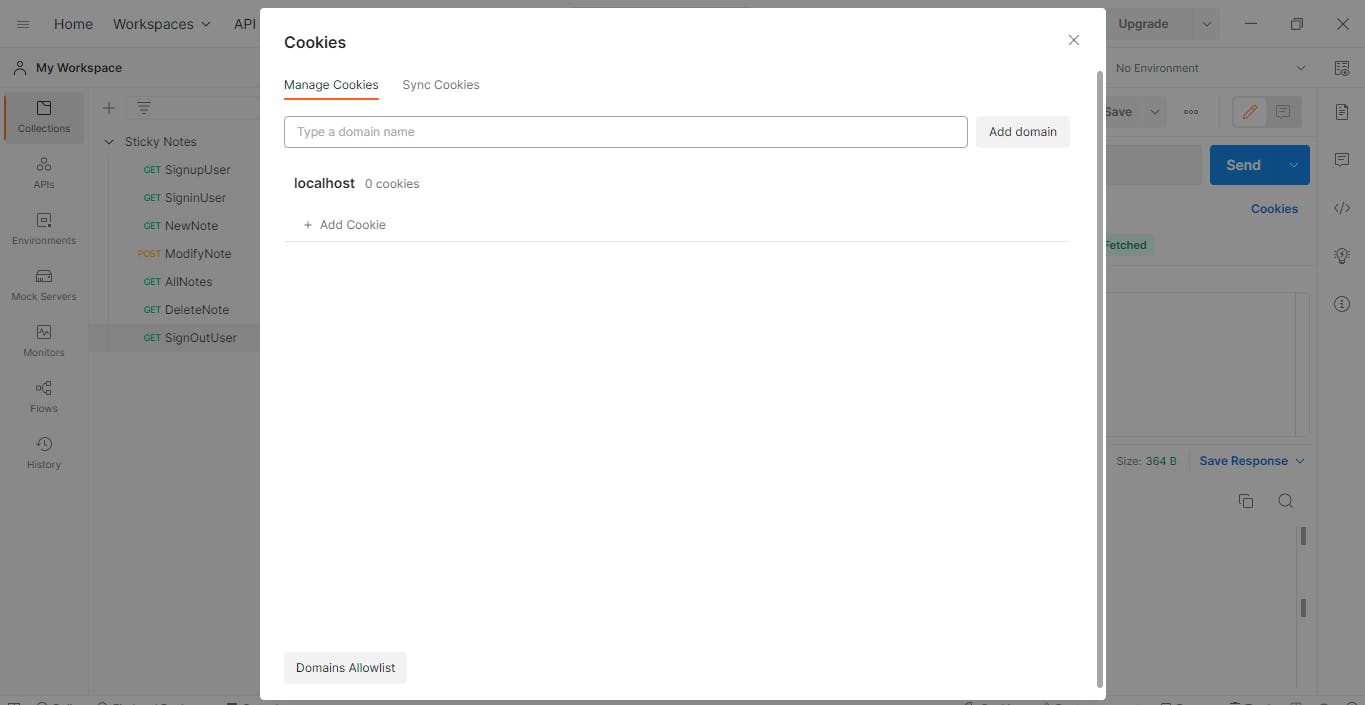
When you click on "Cookies" below the send button after signing out the user, you will see that the access token cookies have been deleted:
Summary and Next Steps
In this section, we built the GraphQL server for the Sticky Note app using Apollo Server 4, Express.js, and MongoDB, following the code-first approach. We then defined various types and fields that can be used to query and modify the API. Finally, we tested the GraphQL APIs using Postman.
In the next section, we will make the frontend aspect built in the previous part communicate with the GraphQL APIs built in this section.