Building an Endless Runner Game with Three.js, Mixamo, Vite, and Planetscale (Part one)


Introduction:
Hi everyone 👋,
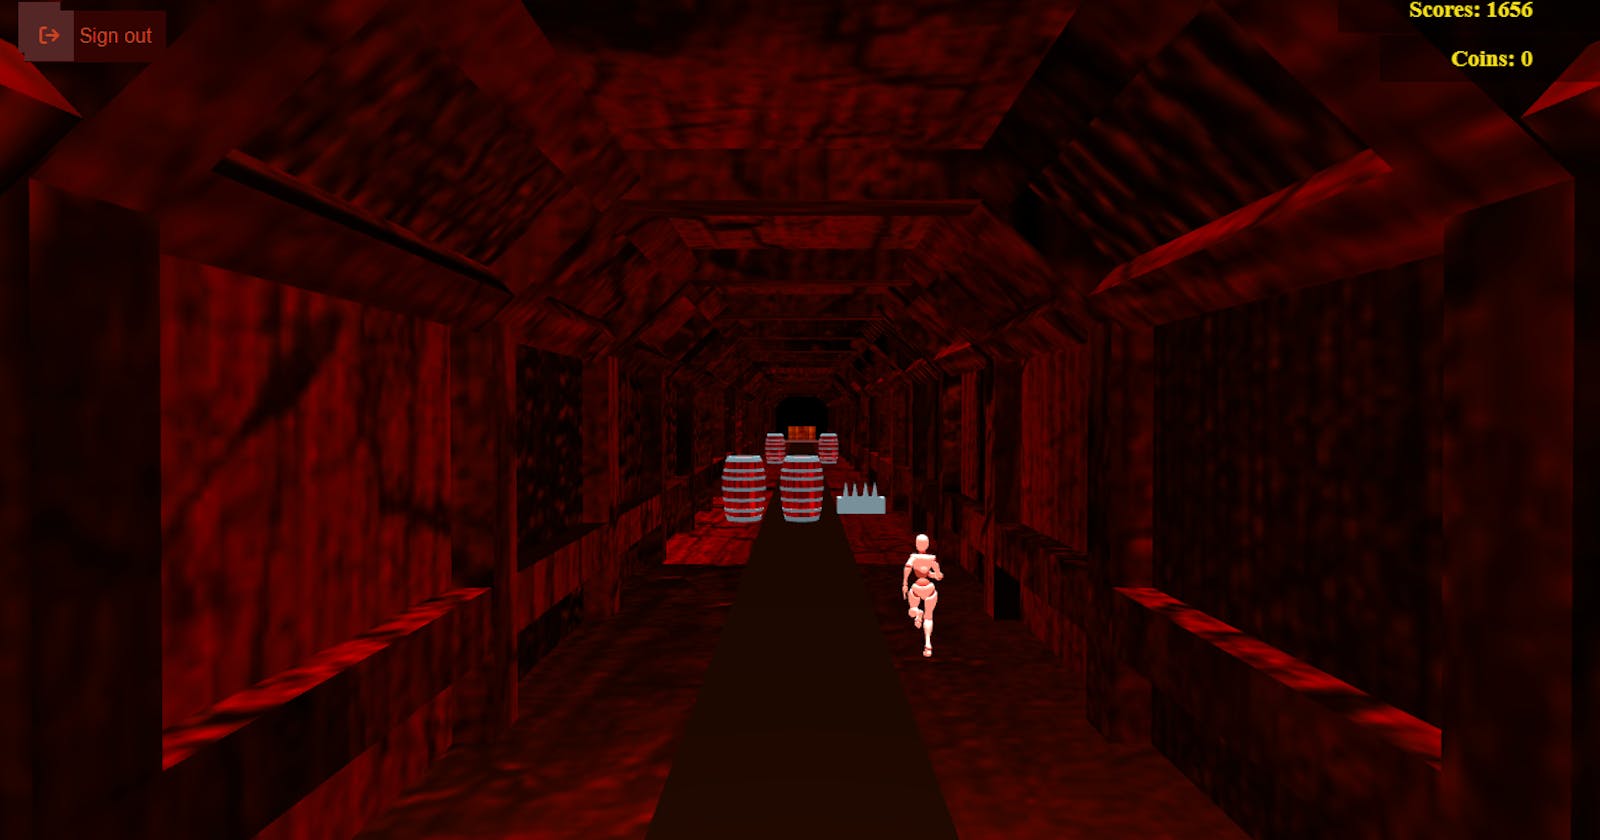
This tutorial series will show you how to create a 3D endless runner game similar to Subway Surfers using Three.js, Mixamo, and Vite. The game, called Cave Runner, features a 3D character running through a wooden cave, avoiding obstacles and collecting coins to unlock more characters. The character runs indefinitely while dodging obstacles spawned in its path.
If you can't wait to see what we are building, here is the link to play the game: http://cave-runner.netlify.app.
You can find the final project of this tutorial here on GitHub: https://github.com/tope-olajide/cave-runner. You can always use it as a reference if you get lost while reading through this tutorial.
What are we building?
We are building an endless runner game; the player can use different characters to run, slide and jump through obstacles. Additionally, the player can save game data online and compete against other players worldwide.
This series was divided into five sections:
Prerequisite
This tutorial assumes basic knowledge of HTML, CSS, and JavaScript.
If you already have knowledge of JavaScript, you can still follow this tutorial without needing to learn TypeScript or threejs.
In the first part of this tutorial, we will go over some aspects of threejs.
Tools
For the development of this game, we will be using the following tools:
Three.js
Three.js is a powerful JavaScript library and API used to create and render 3d applications in the browser. It makes use of WebGL to draw 3D graphics on your browser. Every modern browser should now support and enable WebGL by default, but to clear all doubt, you can visit this link to check if your browser supports it: get.webgl.org.
Mixamo
Mixamo is an excellent website that allows users to rig and animate 3D characters. To follow this tutorial, you don't need any prior rigging or 3D modeling knowledge because Mixamo is providing everything for us, absolutely FREE!
Towards the end of this article, I'm going to show you to download the characters and animations used in this game
PlanetScale
PlanetScale is an easy-to-use MySQL-compatible serverless database platform. We will leverage the power of Planetscale to save and retrieve our game data quickly and conveniently.
Netlify
Netlify is a cloud computing company that offers hosting and serverless backend services for web applications and static websites. We will host this game and the serverless functions that communicate with PlanetScale on it
Vite
Vite is an extremely fast JavaScript build tool for modern web projects. I'm using it for this project because loads very fast and it's easy to set up. To get started with Vite, you must have Nodejs installed; Vite requires Node.js 12.2.0 and above.
Scaffolding the project with Vite
In this section, we will begin by setting up threejs and constructing a scene. Next, we will add a cube and learn how to rotate it. Finally, we will cover how to download the characters and animations that will be used in the game.
The reference code for this section is available here: https://github.com/tope-olajide/cave-runner/tree/ft-animated-cube.
And you can preview the deployed website for this section here: https://deploy-preview-1--cave-runner.netlify.app/
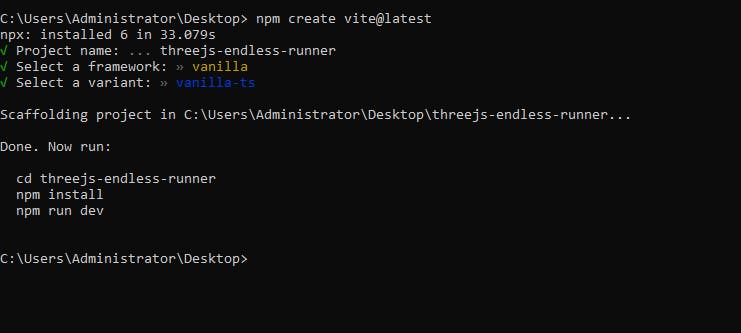
To begin, open your command-line interface and navigate to your workspace directory, then run the following command:
npm create vite@latest
Vite will prompt you for the project name. You can use cave-runner as the project name.
Next, Vite will ask you to choose a framework. Select Vanilla. Then, Vite will prompt you to Select a variant. Use the arrow keys to choose vanilla ts.
We will wait a few moments for Vite to set up our project. Vite will create a new directory with the project name cave-runner.
Run the following command to navigate to the newly created folder:
cd cave-runner
Then run the following command to install the packages generated by Vite:
npm install
Installing ThreeJs
Once all the packages have been installed, run the following command to install Threejs:
npm install three
To install the necessary typing files for threejs, run the following command:
npm install @types/three --save-dev
Setting up the project with ESLint and Airbnb style guide
To setup Eslint, we need to install first it by running the following command:
npm install eslint --save-dev
Next, we need to set up a configuration file for Eslint by running the following command:
npm init @eslint/config
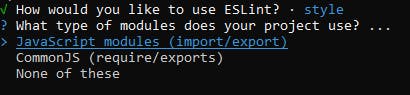
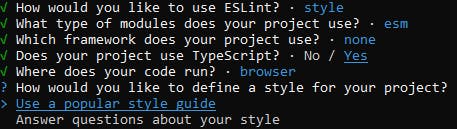
After a few seconds, the CLI will prompt the following questions:
How would you like to use ESLint?...
Select To check syntax, find problems, and enforce code style and press Enter.
What type of modules does your project use?
Select JavaScript modules (import/export) and press Enter.
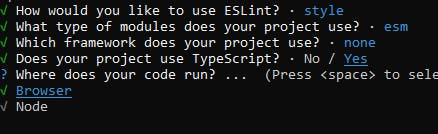
Which framework does your project use?
Select None of these and press Enter

Does your project use TypeScript?
Select Yes and press Enter.

Where does your code run?
Select Browser and press Enter.
How would you like to define a style for your project?
Select Use a popular style guide and press Enter.
Which style guide do you want to follow?
Select Airbnb: https://github.com/airbnb/javascript and press Enter.
What format do you want your config file to be in?
Select JSON and press Enter.
Would you like to install them now?
Select Yes and press Enter.

Which package manager do you want to use?
Select NPM and press Enter.
After that, Eslint will install all the necessary dependencies based on the configuration options we selected.
To make ESLint work in our VS Code editor, we need to install VS Code ESLint extension. This will help us to catch and fix errors inside our editor.
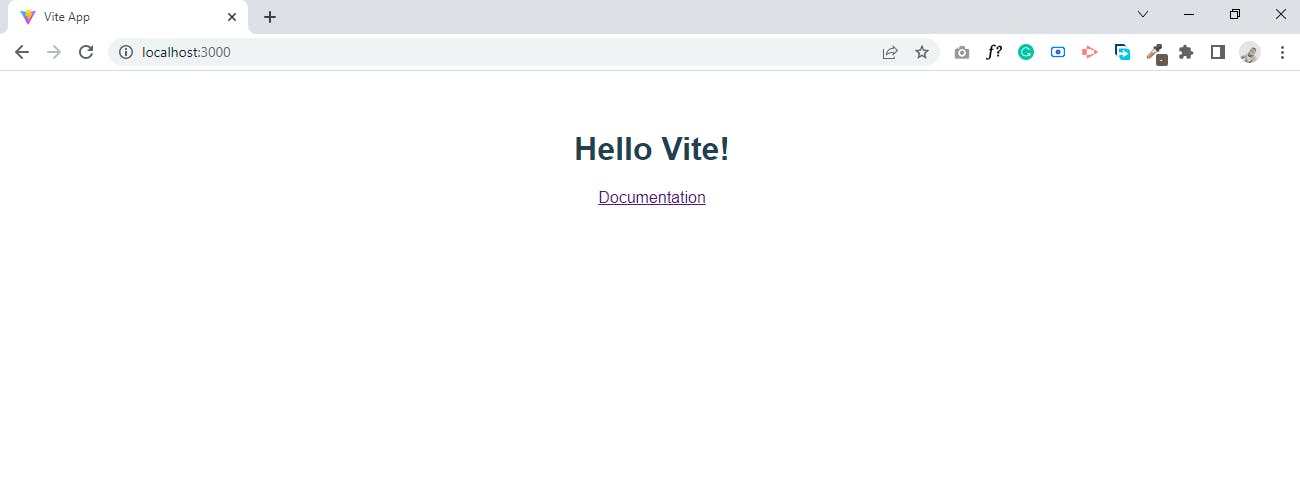
Run the following command to start the development server:
npm run dev
After running the previous command, visit localhost:3000 in your web browser. If the setup was successful, you should see a welcome screen similar to the one shown below:
Setting Up a Scene
I discovered that the equivalent of "Hello World" in the 3D world is creating a scene with lights, a cube, and a camera. This is exactly what we will be doing next in this tutorial.
Open up the index.html file and add a canvas element to it:
<!DOCTYPE html>
<html lang="en">
  <head>
    <meta charset="UTF-8" />
    <link rel="icon" type="image/svg+xml" href="favicon.svg" />
    <link rel="stylesheet" href="./src/style.css" />
    <meta name="viewport" content="width=device-width, initial-scale=1.0" />
    <title>Threejs Endless Runner</title>
  </head>
  <body>
    <canvas id="app"> </canvas>
    <script type="module" src="/src/main.ts"></script>
  </body>
</html>
Let's open style.css and add some basic styles to it:
html,
body {
  overflow: hidden;
  margin: 0px;
  height: 100%;
}

#app {
  font-family: Avenir, Helvetica, Arial, sans-serif;
  -webkit-font-smoothing: antialiased;
  -moz-osx-font-smoothing: grayscale;
  text-align: center;
  width: 100%;
  height: 100%;
  display: block;
}
Now, let's open the main.js file in the src folder, clear all the existing code, and add the following code:
import { WebGLRenderer, PerspectiveCamera, Scene } from 'three';

const width = window.innerWidth;
const height = window.innerHeight;

const renderer = new WebGLRenderer({
  canvas: document.getElementById('app') as HTMLCanvasElement,
  antialias: true,
  precision: 'mediump',
});
const mainCamera = new PerspectiveCamera(60, width / height, 0.1, 1000);
function onWindowResize() {
  mainCamera.aspect = window.innerWidth / window.innerHeight;
  mainCamera.updateProjectionMatrix();

  renderer.setSize(window.innerWidth, window.innerHeight);
}

window.addEventListener('resize', onWindowResize);

renderer.setSize(width, height);
What's happening here?

We have imported the Scene, PerspectiveCamera, and WebGLRenderer objects from three.js to start using it. These three objects are necessary to display anything with three.js. Here's a brief explanation of each:
The Scene
A typical threejs scene comprises a Camera, Light, and 3D objects. The scene is where we set up all objects that need to be rendered. Objects like our 3D models, Light, Cameras, etc., are positioned here.
The PerspectiveCamera
Basically, only the objects that are shown by the camera will be rendered to the screen. There are different types of cameras in three.js, the Perspective Camera and the Orthographic Camera. The Perspective Camera mimics how the human eye sees. For example, when you view objects at a long distance, they appear smaller and get bigger when moving closer. That's the way the perspective camera works. I will be using the perspective camera throughout the development of this project.
The perspective camera takes in four arguments which are:
1. Field of View: FoV is the maximum area that the camera can see at a given time. The default value is 50, but I'll use 60 for this example. There is really no perfect Field of View value for video games. Just keep adjusting the number till you get the perfect value for the game you are building.
2. Aspect Ratio: the aspect ratio is the ratio of width and height of the screen. The default value is 1, but I used the width of the user's device divided by the height (width/height).
3. Near Plane: This specifies how close the objects in a scene are to the camera. The default value is 0.1. Anything closer than 0.1 to the camera will not be rendered.
4. Far Plane: This specifies how far the objects in a scene are from the camera. The default value is 2000. I will be using 1000 in this example. Anything objects farther than 1000 from the camera will not be captured by the camera.
WebGLRenderer
Three.js uses WebGLRenderer to draw everything the camera sees to the screen using WebGL on supported devices.
const renderer = new WebGLRenderer({
  canvas: document.getElementById('app') as HTMLCanvasElement,
  antialias:true,
  precision:'mediump'
});
In the above code, we specify the canvas that the WebGLRenderer will use to draw everything it sees. We also enable the antialias option to eliminate jagged edges in our game and the 'mediump' precision option to ensure the game can run smoothly on lower-end devices. Other precision settings options include 'lowp' and 'highp'.
In the following snippet:
renderer.setSize(width, height);
we set the size of the output canvas to the width and the height provided.
The line of code const scene = new Scene(); creates a new scene.
The onWindowResize function scales the content of the canvas to fit the width and height of the device's screen any time the player resizes or rotates the screen.
Creating a Cube
Let's update our main.ts file with the following code:
import {
  WebGLRenderer, PerspectiveCamera, Scene, BoxGeometry, MeshPhongMaterial, Mesh,
} from 'three';

const width = window.innerWidth;
const height = window.innerHeight;

const renderer = new WebGLRenderer({
  canvas: document.getElementById('app') as HTMLCanvasElement,
  antialias: true,
  precision: 'mediump',
});
const mainCamera = new PerspectiveCamera(60, width / height, 0.1, 1000);
function onWindowResize() {
  mainCamera.aspect = window.innerWidth / window.innerHeight;
  mainCamera.updateProjectionMatrix();

  renderer.setSize(window.innerWidth, window.innerHeight);
}

window.addEventListener('resize', onWindowResize);

renderer.setSize(width, height);

const geometry = new BoxGeometry();
const material = new MeshPhongMaterial({ color: 0x0000ff });
const cube = new Mesh(geometry, material);
cube.position.z = -5;
const scene = new Scene();

scene.add(cube);
renderer.render(scene, mainCamera);
We have imported the BoxGeometry, MeshPhongMaterial, and Mesh objects from three.js.
The BoxGeometry class is used to create a six-sided solid shape with specified 'width', 'height', and 'depth'."
The MeshPhongMaterial is used to apply color and other properties such as emissive, specular, shininess, and others to the surface of 3D objects.
The Mesh object takes in the geometry we created and applies the materials to it. Then we set the cube position on the z-axis to -5, right in front of the camera.
The default position of the camera is (0,0,0), which means it is located at the origin of the X, Y, and Z axes in the cartesian coordinate system used by three.js to position objects in a scene.
scene.add(cube); adds the cube object to the scene.
Finally, the renderer.render(scene, mainCamera); method takes in the scene and camera as arguments and renders everything that the camera sees onto the screen.
If you refresh your browser now, you will see a black screen. Don't worry, this is because we haven't added a light source yet.
Let there be Light
Let's update the main.ts file with the following code:
import {
  WebGLRenderer, PerspectiveCamera, Scene, BoxGeometry, MeshPhongMaterial, Mesh, DirectionalLight,
} from 'three';

const width = window.innerWidth;
const height = window.innerHeight;

const renderer = new WebGLRenderer({
  canvas: document.getElementById('app') as HTMLCanvasElement,
  antialias: true,
  precision: 'mediump',
});

const mainCamera = new PerspectiveCamera(60, width / height, 0.1, 1000);
function onWindowResize() {
  mainCamera.aspect = window.innerWidth / window.innerHeight;
  mainCamera.updateProjectionMatrix();

  renderer.setSize(window.innerWidth, window.innerHeight);
}

window.addEventListener('resize', onWindowResize);

renderer.setSize(width, height);

const geometry = new BoxGeometry();
const material = new MeshPhongMaterial({ color: 0x0000ff });
const cube = new Mesh(geometry, material);
cube.position.z = -5;
const scene = new Scene();

scene.add(cube);
const light = new DirectionalLight(0xFFFFFF, 1);
light.position.z = 2;
scene.add(light);

renderer.render(scene, mainCamera);
We imported the DirectionalLight from three.js and set its color to white (0xFFFFFF) and intensity to 1. Then, we positioned the light on the z-axis at 2 to keep it between the camera and the cube. Finally, we added it to the scene using scene.add(light);.
If you refresh your browser now, you should see the cube we added to the scene.

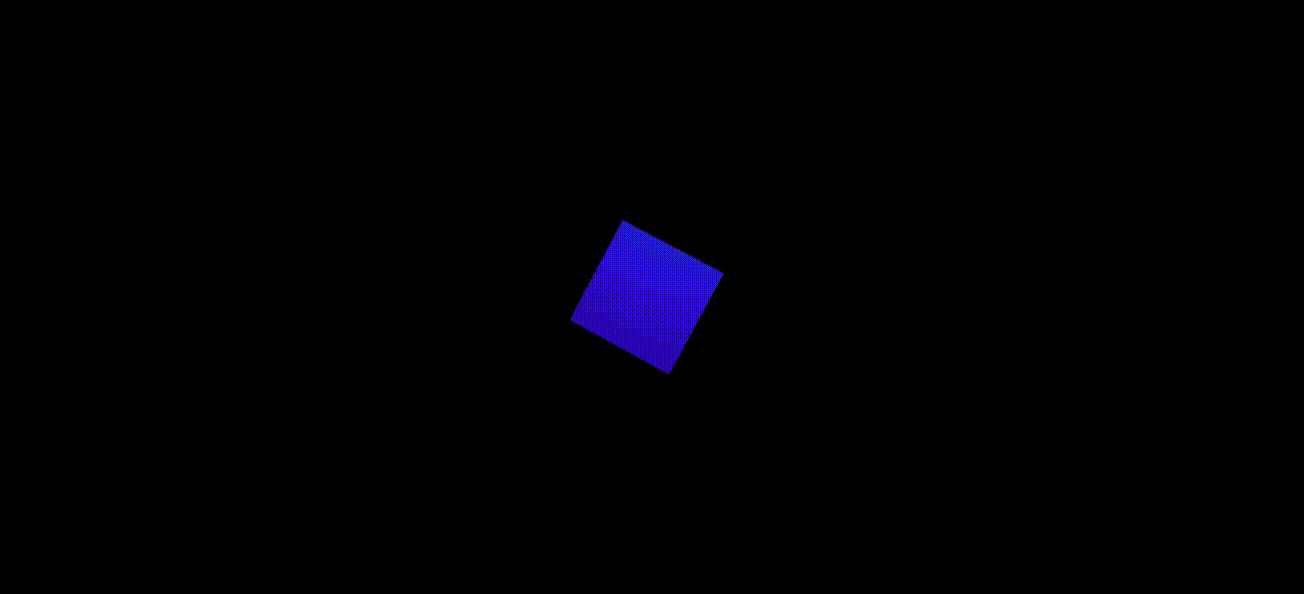
Rotating the Cube
We will make the cube more dynamic by adding rotation to it. Update the main.js file with the following code:
import './style.css'

import { WebGLRenderer, PerspectiveCamera, Scene, BoxGeometry, MeshPhongMaterial, Mesh, DirectionalLight } from 'three';

const width = window.innerWidth;
const height = window.innerHeight;

const renderer = new WebGLRenderer({
  canvas: document.getElementById('app') as HTMLCanvasElement
});
renderer.setSize(width, height);

const mainCamera = new PerspectiveCamera(60, width / height, 0.1, 1000);

const scene = new Scene();

const geometry = new BoxGeometry();
const material = new MeshPhongMaterial({ color: 0x0000ff });
const cube = new Mesh(geometry, material);
cube.position.set(0, 0, -5);

scene.add(cube);

const rotateCube = () => {
  cube.rotation.y -= 0.03;
  cube.rotation.z -= 0.01;
}
const light = new DirectionalLight(0xFFFFFF, 1);
light.position.set(0, 0, 2);
scene.add(light);

const render = () => {
  rotateCube();
  renderer.render(scene, mainCamera);
  requestAnimationFrame(render);
}
render();
We created a function that rotates the cube on the y-axis by -=0.03 and on the z-axis by -= 0.01, and called it rotateCube. I also created a render() function. I called the rotateCube() function inside the render() function and we move the renderer.render(scene, mainCamera) to the render() function.`
We created a function called rotateCube that rotates the cube on the y-axis by -=0.03 and on the z-axis by -=0.01. We also created a render() function and called rotateCube() inside it. We moved the renderer.render(scene, mainCamera) line of code to the render() function.
Inside the render function, I created the requestAnimationFrame() function, which takes in the render function as an argument.
The 'Window.requestAnimationFrame()' method creates a loop that repeatedly calls everything inside the 'render()' function, typically up to 60 times per second.
If everything goes according to plan, we should see a screen that looks like this:
The 3D Assets used in this tutorial
The Wooden cave, Coins, and obstacles (Spike, wooden box, and barrel) used in this tutorial were created by me using Blender and are free to use for any purpose. The 3D characters and animations used in this tutorial were downloaded from Mixamo. Mixamo is free to use for personal and commercial purposes, though there are some restrictions listed on their website, they are:
Mixamo is not available for Enterprise and Federated IDs.
Mixamo is not available for users who have a country code from China. The current release of Creative Cloud in China does not include web services.
You can click on this link for more information. The 3D characters used in this project may differ slightly from the original versions downloaded from Mixamo. This is because I optimized the models by reducing the resolution of their materials and decreasing the polygon count on some models to decrease the size of the models and improve the game's download speed. However, you can still use the original files if you prefer.
How To download the characters and animations from Mixamo
This tutorial uses the models and animations that are already included in the public/assets folder of this project. If you don't plan on adding more characters or animations, you can skip this section.
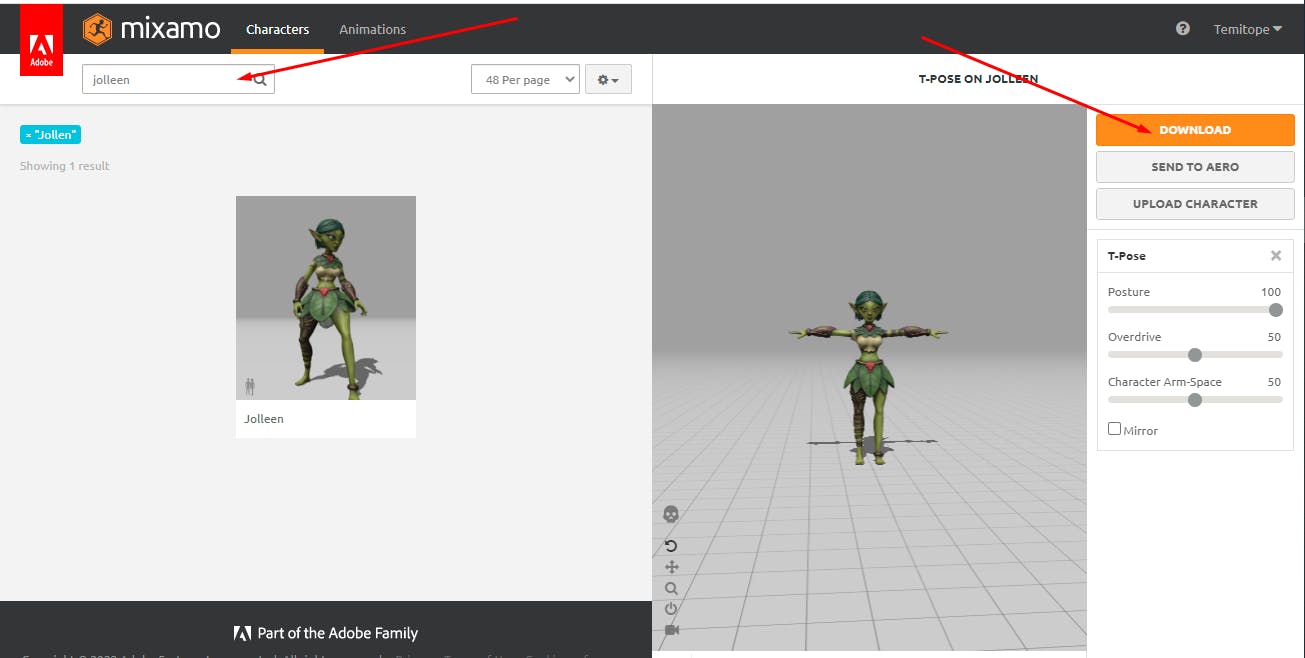
Xbot, Jolleen, and Ty are the main characters featured in this game, but you can add more if you prefer. Each character will have a set of animations, including running, jumping, sliding, stumbling, and dancing.
Downloading a Character
To download from Mixamo, you'll need to have an Adobe account. If you don't already have one, visit mixamo.com on your computer and click "Signup." If you already have an Adobe account, click "Log in."
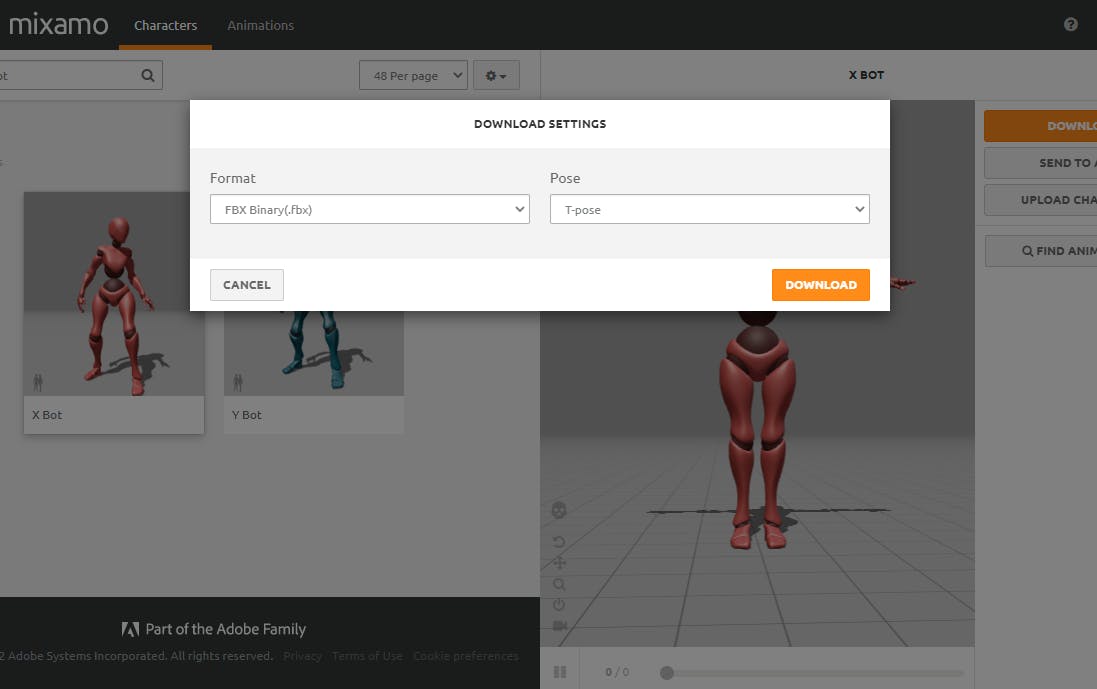
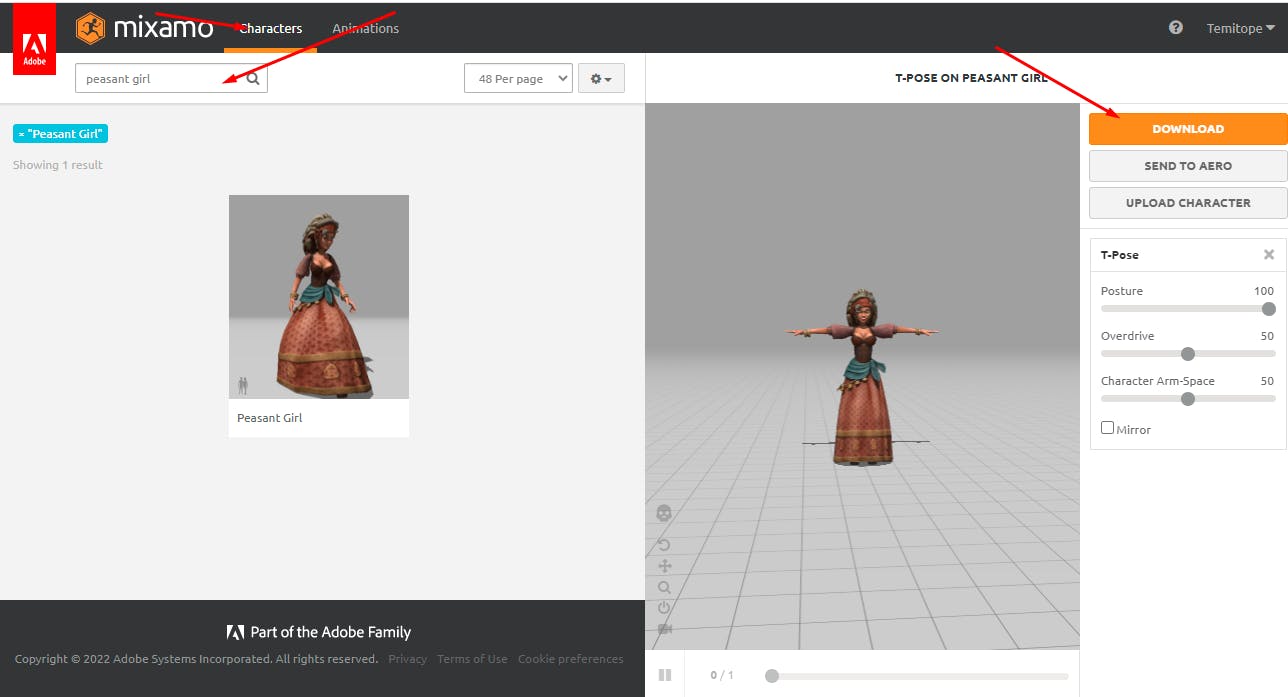
Once you are logged in, you will see two tabs at the top left of the page Characters and Animations. Click on the Characters tab and search for Xbot:
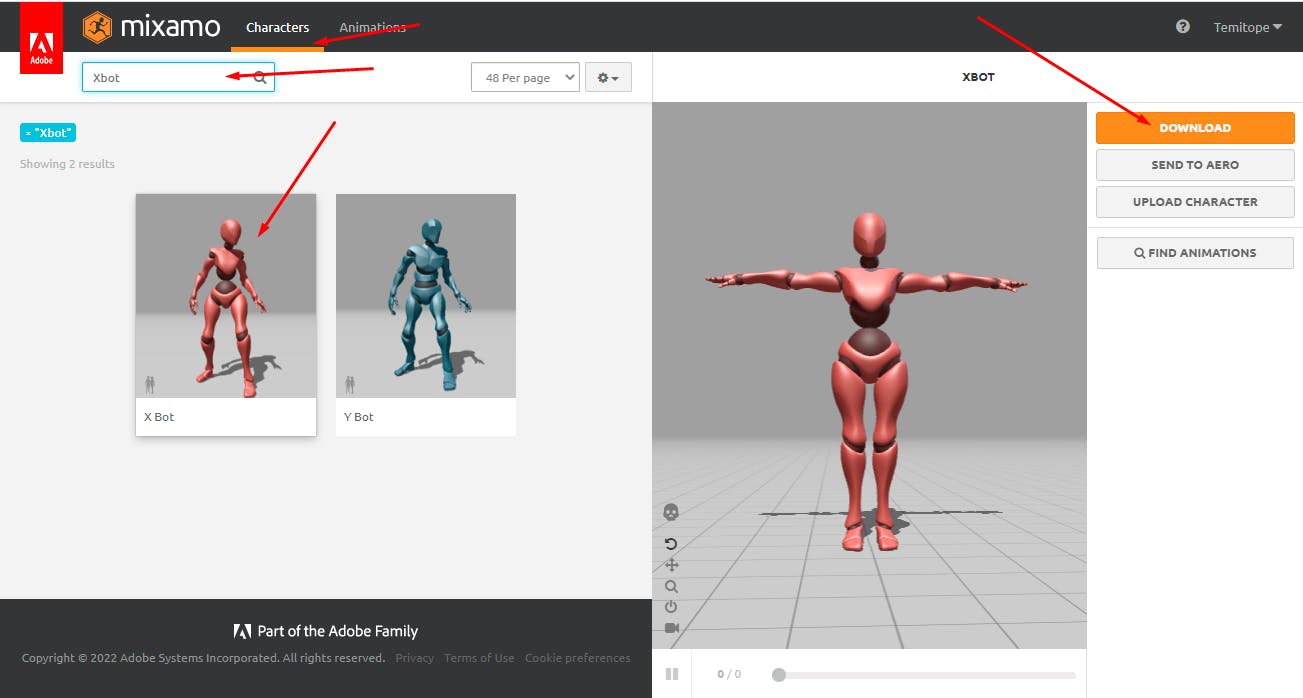
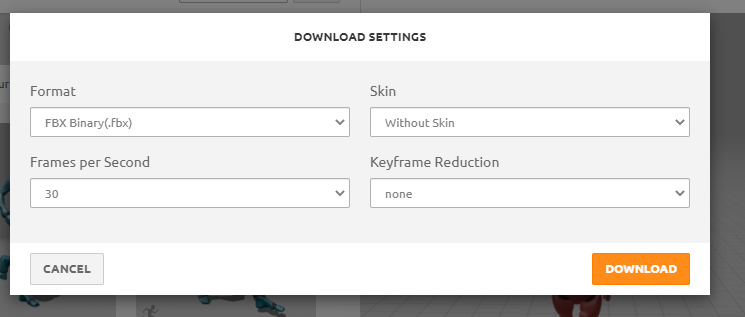
Select X bot and click on the download button. A Download Settings dialog will pop up, under the Format, select FBX Binary(.fbx) and under Pose Select T-Pose, then click on the Download button.
Downloading X Bot Animations
How to download the running animation
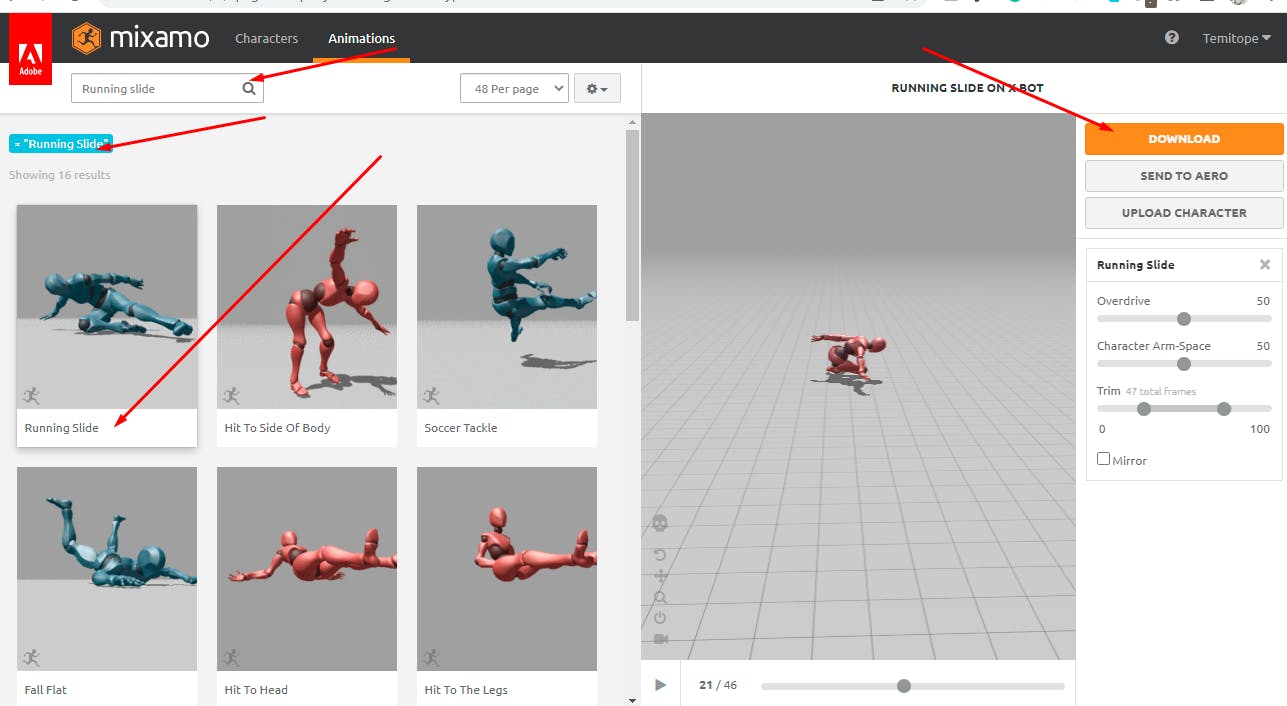
Switch to the Animations tab, and make sure that Xbot is the selected character (the selected character will appear on the right-hand side, beside the animations). It is very important because the animations we are about to download can only work for the selected character.
Search for Running, Mixamo has many running animations, some of which are named Running, so you will have to choose the best running style that suits your game. Also, remember to check the in place option. This will prevent the animation from moving out of place while it's playing in the game.
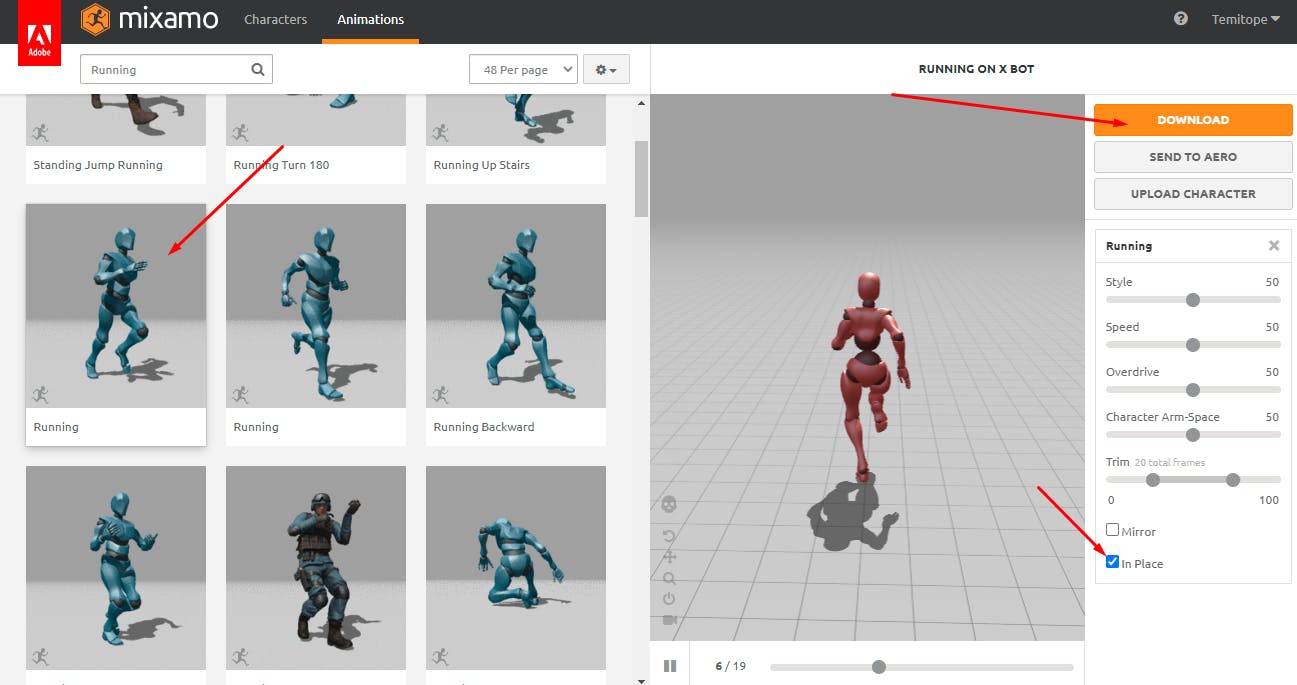
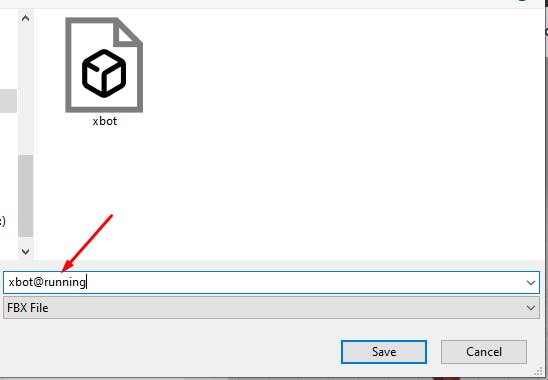
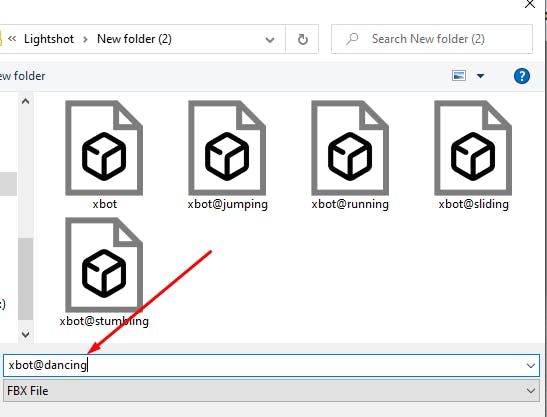
To download, click the "download" button. A "Download Settings" dialog will appear. Under the "Skin" option, select "without skin". We selected this option because we don't need to download the animation with the model; we already have it. Leave the other options as they are, and then click "download." When saving the animation, it is important to use a specific naming convention to uniquely identify the animation for each character. For example, you could save the animation as "xbot@running". This will help you easily identify which animation belongs to which character.

Downloading The Jumping Animation
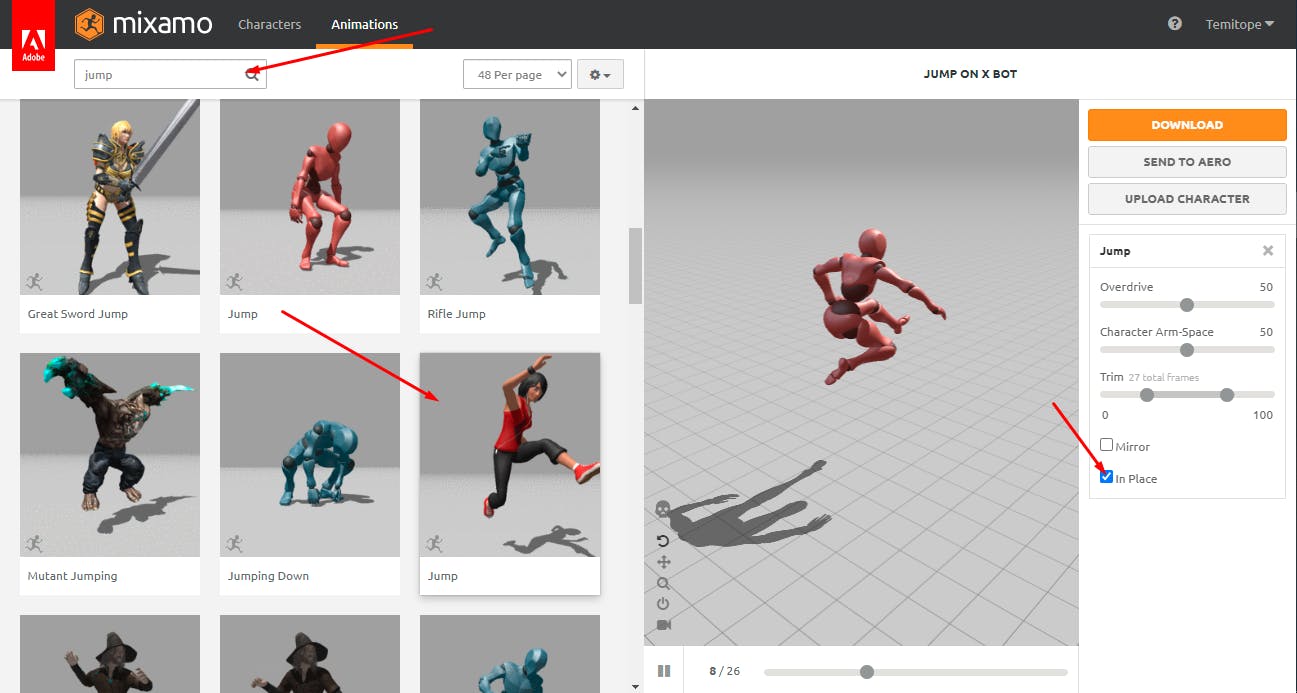
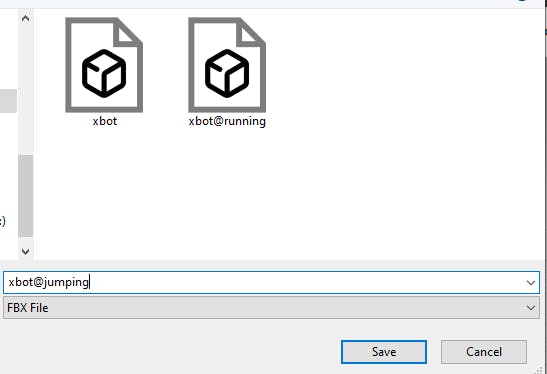
Switch to the Animations tab if you are not there already, and make sure that Xbot is still the selected character. Search for "Jump," just like you did for the running animations. Mixamo has many jumping animations, some of which are named "Jump." I've added a screenshot of the one I chose below, which also has the "in place" option. Remember to save it as "xbot@jumping" and to download "without skin."
Downloading The Sliding Animation
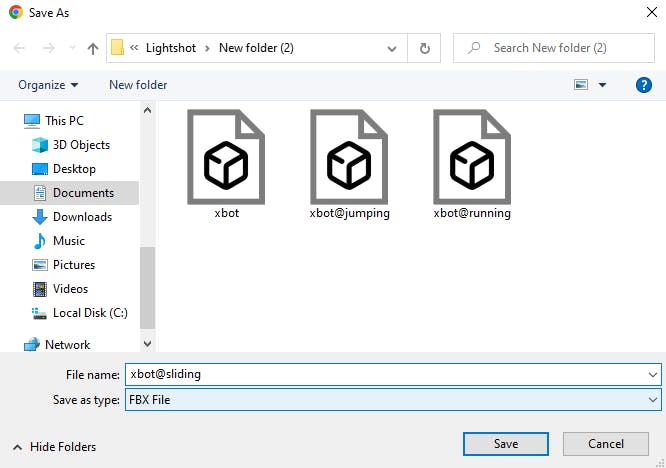
On the Animations tab, search for Running slide. Again, there would be a lot of results, but select only the one named Running Slide among the results (see the attached screenshot below). Unfortunately, in "place option" is not available for this specific animation, so we will use threejs later in this tutorial to force the animation to remain in the same position while playing. Also, remember to save it as xbot@sliding, and remember to download without skin.
To find the Slide animation used in this tutorial, go to the Animations tab and search for Running slide. You should see a list of results, but select only the one named Running Slide (refer to the attached screenshot). Note that the "place option" is not available for this particular animation, so we will use threejs later on in the tutorial to keep the animation in place during playback. Be sure to save it as xbot@sliding and download it without skin.
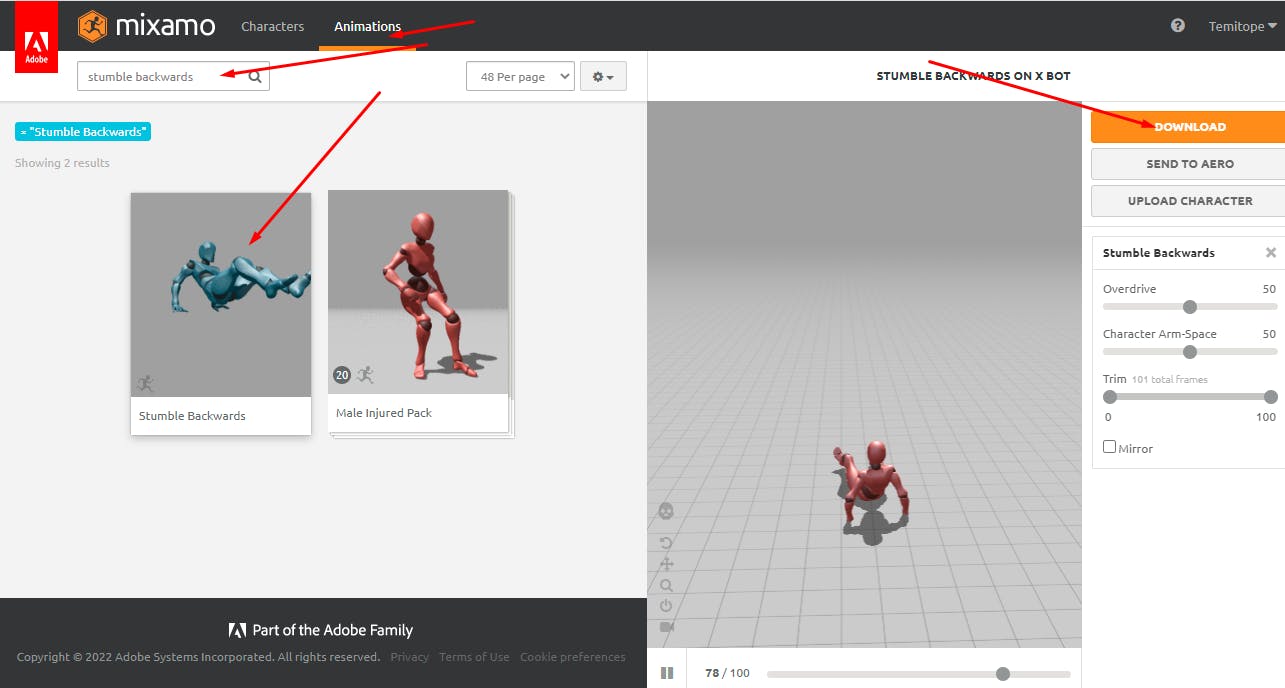
Downloading The Stumbling Animation
On the Animations tab, search for stumble backwards (See the attached screenshot). Select download without skin, and save it as xbot@stumbling.

Downloading The Dancing Animation
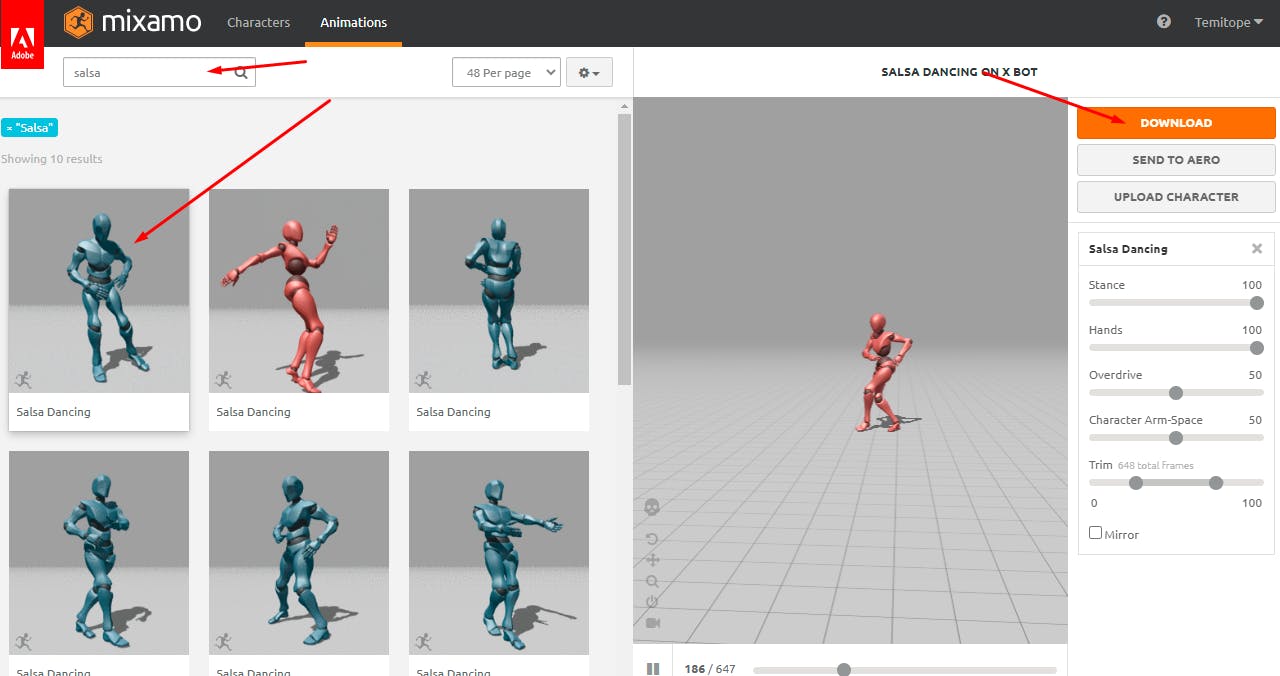
Go back to the Animations tab and search for salsa, then select the first one. Download without skin, and save it as xbot@dancing.
That's all! You can repeat the same process Jolleen and Peasant Girl:
Summary and next steps
In this article, I explained how to set up a threejs app with Vite, and then proceeded to build a scene that contained a light camera and animated cube. I also explained how to download the characters used in this game with their animations.
The next part of the tutorial is probably going to be the longest part of this series, we will learn how to:
import 3D models into a scene.
animate the character by making it run, jump, slide and stumble.
detect collisions with obstacles and coins.
save the coins and scores, and many more.